
How to Create Your Own Actions
February 9, 2015
Tired of spending money on Photoshop Actions? Is there a certain color tone that you created once that you just love and want to be able to add to other images quickly? What if you knew how to create actions yourself? Here are some easy steps to do that and make the process seamless to boot.
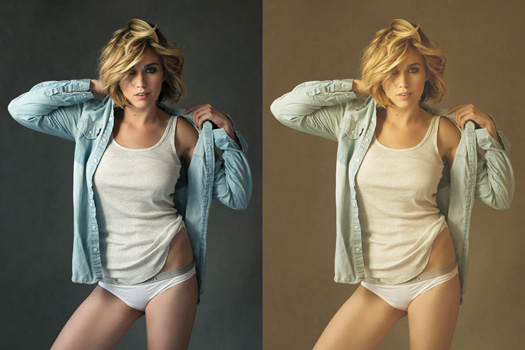
Damian Battinelli’s original image (left) and the one created with his “Golden Haze” action (right). Photos © Damian Battinelli
Taking Action
As most of us know, an action is a series of pre-recorded events or tasks that can be applied to any image by pressing the Play button. You can locate the Actions panel by going to Window > Actions. This will open the Actions panel, which will already consist of a few default actions that come from Adobe. There are control buttons at the bottom of the panel. Once you click record, everything you do is being recorded. You can stop the recording at any time, delete mistakes and even begin recording again to continue the action tasks. It’s very easy to use, but there is some planning required on your part to make them work consistently.
TIMESAVER TIP #1
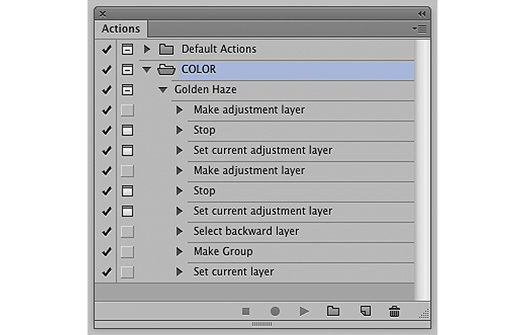
Before you begin recording, open the Adjustment panel by going to Window > Adjustments. Drag the panel to your vertical dock on the right and drop it in next to your Layers. This allows you to easily switch back and forth from the Layers and Actions panels. Within your Actions panel, create a new set and name it. To create a new set, click on the folder icon at the bottom of the panel. I’ve named mine COLOR since this will contain my colorizing actions. While the new folder is selected, you’ll start the recording by selecting the New Action icon located to the right of the folder icon.
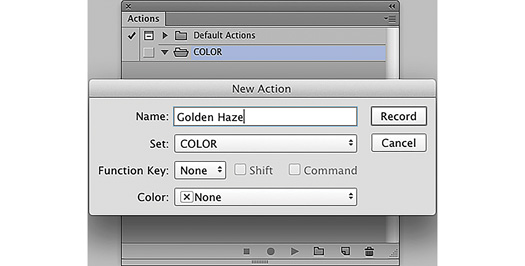
Name the new action with some descriptive words like I did with “Golden Haze” and click Record. Now everything you do while it’s recording is doing as the command suggests.
TIMESAVER TIP #2
Actions need to be created using nonspecific layers or names. If you create an action using specific names such as “Background copy” or “Layer 1 copy,” for example, the action will look for these specific names or layers. In other words, you want Photoshop to find the layer below or above, not “Layer 1 copy.” This will cause an error message if those specific names aren’t found and you’ll be pulling your hair out! The way around this is to use keyboard shortcuts that prompt Photoshop to use the nonspecific layers you actually want. ALT/OPT + [ selects layers below, and ALT/OPT + ] selects above. Holding down SHIFT along with the keyboard shortcuts will select multiple layers.
Adjusting The Color
There are a couple of ways to adjust color, such as adding a Curves adjustment layer, but for our purposes, I’m going to adjust my colors using a Color Balance adjustment layer.

I’ve added the adjustment layer by clicking on the icon that looks like a scale. I made my adjustments with the red and yellow sliders until I was happy, double clicked on the layer and named it GOLD. I then added a Curves adjustment layer by clicking on the icon that looks like a grid with a curved S-type line.
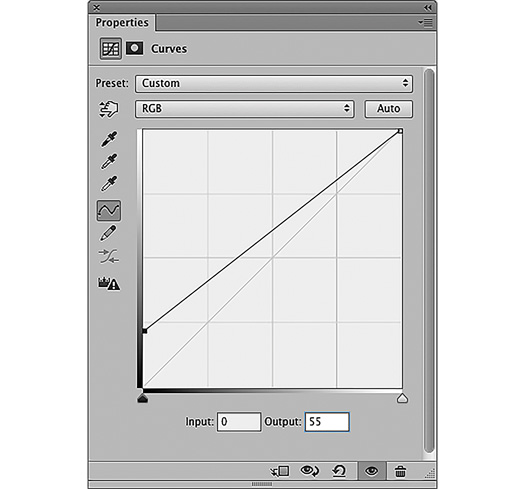
I created the “haze” by dragging the lower left point of the line straight up until it created the look I wanted and named it HAZE.
Grouping Layers
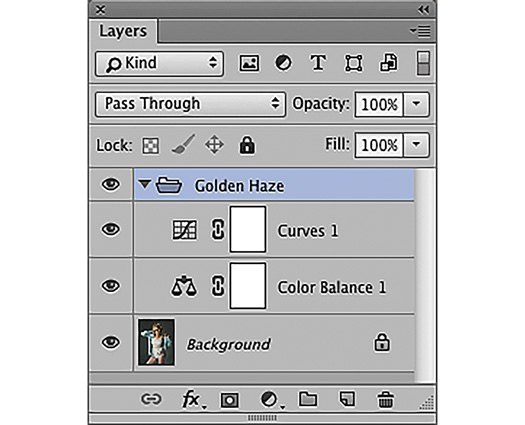
For the sole purpose of staying organized, I’ll group the layers. After selecting my top layer HAZE, I pressed SHIFT + ALT/OPT + selecting the layer GOLD below. While the two layers are selected, I used the keyboard shortcut COMM + G to group them. I recommend calling it the same name you gave the action, so double click on the new group within your layers panel and name it.
Now’s the time to stop the recording by pressing the stop button at the bottom of the Actions panel. You can press the stop button at any time; to start recording again, just select the last action in your actions dialog panel and hit record to continue. If you make a mistake, press stop, select the mistake and press the trash icon to delete it. Begin the recording again where you left off.
TIMESAVER TIP #3
If you want Photoshop to prompt you to make the adjustments while the action is performing, you can. This is done after you’ve stopped the creation of your action. By clicking on the toggle dialog on/off box to the left of the task, Photoshop will prompt you to make adjustments to the task.
If you want to add a note for instruction, you’ll need to insert stops above the task, enter the descriptive instructions and turn on the dialog box to the left of the stop. To do this, go to the actions menu and click on Insert Stop. Enter the instructions and click on the Allow Continue box at the bottom left. Make sure the dialog boxes are turned on for both the stop and the task.
Saving Your Actions
In order to save your actions, you need to select the set or folder, not the actual action. Click on the Actions menu icon and select Save Actions—this will allow you to save it anywhere you’d like. I recommend creating a folder that contains your custom actions. In order to load any action, you simply select Load Actions in the same menu and select the actions from where you saved them when it prompts you to.
Another handy way to use actions is to create resizing actions for social media. Find out the best dimensions for that specific social media site and create the action to resize your image and name it something like “Resize for Facebook.” A simple Google search will help you find the current required dimensions for these sites. Once you play around with these and get a grasp on how actions work and using keyboard shortcuts, you’ll be able to create just about anything.
Related Links
7 Techniques to Tackle Advanced Lightroom
How to Composite Your Photos Seamlessly
Plug-In Review: Imagenomic Portraiture for Video
Related Articles

Raw Portraits of Acceptance — The “As I Am” Project
April 25, 2024
On Valentine’s Day 2023, I began a personal project creating raw portraits. I was nervous (read: terrified) to follow my heart in this way. In fact, I’d put it on the back burner for nearly two years. But when you survive cancer, scary things (like photography projects) feel less scary. And when you survive cancer, the things you do and...
More »

Guide to Photographing Weddings in Cathedrals and Temples
April 23, 2024
Photographing weddings in dark indoor environments like cathedrals, temples, and other religious structures present unique challenges and opportunities for photographers. The low light, the intimacy of the venue, and the solemnity of the moment require a delicate balance between technical skill and creative vision. This guide is designed to help photographers navigate these challenges, ensuring that every shot reflects the...
More »

Fine Art School Portraits: Get Started Today!
April 18, 2024
In my fourteen years of growing my custom portraiture business, one venture stands out as exceptionally beneficial: the launch of my Fine Art School Portrait service. Providing Fine Art School Portraits for select Seattle area schools not only brings in significant profits, but it also keeps my portrait bookings steady and eliminates slow seasons. Having photographed thousands of children ranging...
More »
