
How to Shoot Great Photographs with Any Camera
May 26, 2016
Chances are, your brain is already hard-wired to dial in correct exposure values in nearly any shooting situation. But Bryan Peterson can help you master the art of manipulating exposure to create the more creative types of pictures you’re after. In this fourth edition, Peterson adapts his celebrated demystification techniques to current gear and shooting styles, but his “photographic triangle” (see the excerpt below) and down-to-earth explanations still form the backbone of this evergreen of photographic literature. A must for you slackers, and for newbies, and great reference material for even the most seasoned pros.
THE PHOTOGRAPHIC TRIANGLE
(Excerpted with permission from Bryan Peterson’s Understanding Exposure: How to Shoot Great Photographs with Any Camera, Fourth Edition, pages 10 to 15)
The last thing I want you to do is forever leave your camera’s aperture at f/5.6 and simply adjust the shutter speed for the light falling on your subject until the viewfinder indicates a correct exposure. Before you forge ahead with your newfound ease in setting a manual exposure, you need to learn some basic concepts about exposure.
A correct exposure is a simple combination of three important factors: aperture, shutter speed, and ISO. Since the beginning of photography, these three factors have always been at the heart of every exposure, whether that exposure was correct or not, and they still are today—even with digital cameras. I refer to them as the photographic triangle.
Locate the button, wheel, or dial on your camera or lens that controls the aperture. If you’re using an older camera and lens, the aperture control is a ring that you turn on the lens itself. Whether you push buttons, turn a wheel, or rotate a ring on the lens, you’ll see a series of numbers coming up in the viewfinder or on the lens itself. Among all the numbers you’ll see, take note of 4, 5.6, 8, 11, 16, and maybe even 22. (If you’re shooting with a fixed-zoom-lens digital camera, you may find that your apertures don’t go past 8 or maybe 11.) Each one of these numbers corresponds to a specific opening in your lens, and those openings are called f-stops. In photographic terms, the 4 is called f/4, the 5.6 is f/5.6, and so on. The primary function of these lens openings is to control the volume of light that reaches the digital media or film during an exposure. The smaller the f-stop number, the larger the lens opening; the larger the f-stop number, the smaller the lens opening.
For the technical-minded out there, an f-stop is a fraction that indicates the diameter of the aperture. The f stands for the focal length of the lens, the slash (/) means “divided by,” and the number represents the stop in use. For example, if you were shooting with a 50mm lens set at an aperture of f/1.4, the diameter of the actual lens opening would be 35.7mm. Here, 50 (lens focal length) divided by 1.4 (stop) equals 35.7 (diameter of lens opening). Whew! It makes my head spin just thinking about all that. Thank goodness this has very little, if anything, to do with achieving a correct exposure.
Interestingly enough, each time you descend from one aperture opening to the next, or stop down, such as from f/4 to f/5.6, the volume of light entering the lens is cut in half. Likewise, if you change from an aperture opening of f/11 to f/8, the volume of light entering the lens doubles. Each halving or doubling of light is referred to as a full stop. This is important to note since most cameras today offer not only full stops but also the ability to set the aperture to one-third stops: f/4, f/4.5, f/5, f/5.6, f/6.3, f/7.1, f/8, f/9, f/10, f/11, and so on. (The underlined numbers represent the original, basic stops, and the others are the newer one-third options that are also available as a custom setting that is found in your camera’s menu.)
Now let’s turn to shutter speed. Depending on the make and model, your camera may offer shutter speeds from a blazingly fast 1/8000 sec. all the way down to 30 seconds. The shutter speed controls the amount of time that the volume of light coming through the lens (determined by the aperture) is allowed to stay on the digital media or film in the camera. The same halving and doubling principle that applies to aperture applies to shutter speed.
Let me explain. Set the shutter speed control on your camera to 500. This number denotes a fraction—500 represents 1/500 sec. Now change from 500 to 250; again, this represents 1/250 sec. From 1/250 sec. you go to 1/125, 1/60, 1/30, 1/15, and so on. Whether you change from 1/30 sec. to 1/60 sec. (decreasing the time the light stays on the digital media/film) or from 1/60 sec. to 1/30 sec. (increasing the time the light stays on the digital media/film), you’ve shifted a full stop. This is important to note since most cameras today also offer the ability to set the shutter speed to one-third stops: 1/500 sec., 1/400 sec., 1/320 sec., 1/250 sec., 1/200 sec., 1/160 sec., 1/125 sec., 1/100 sec., 1/80 sec., 1/60 sec., and so on. (Again, the underlined numbers represent the original basic stops, and the others are the newer one-third options that sometimes are available.) Cameras that offer one-third stops reflect the camera industry’s attempts to make it easier for you to achieve “perfect” exposures. But as you’ll learn later on, it’s rare that one wants a perfect exposure.
The final leg of the triangle is ISO. Whether you shoot with a digital or a film camera, your choice of ISO has a direct impact on the combination of apertures and shutter speeds you can use. It’s so important that it warrants its own discussion and exercise.
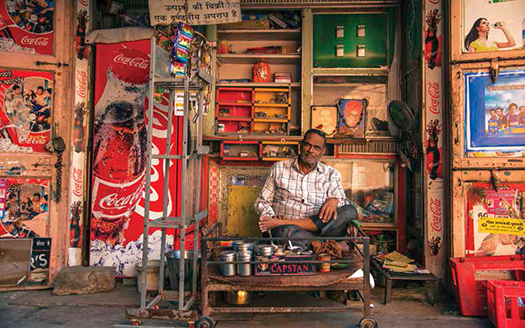
Nikon D800E, Nikkor 24-120mm at 120mm, f/8 for 1/320 sec., ISO 200. Reprinted with permission from Understanding Exposure, by Bryan Peterson, © 1990, 2004, 2010, 2016, published by Amphoto Books, an imprint of Penguin Random House LLC. Photography © 2016 by Bryan Peterson.
EXERCISE: UNDERSTANDING ISO
To better understand the effect of ISO on exposure, think of the ISO as a worker bee. If my camera is set for ISO 100, I have in effect 100 worker bees, and if your camera is set for ISO 200, you have 200 worker bees. The job of these worker bees is to gather the light that comes through the lens and make an image. If both of us set our lenses at the same aperture of f/5.6—meaning that the same volume of light will be coming through our lenses—who will record the image the fastest, you or me? You will, since you have twice as many worker bees at ISO 200 as I do at ISO 100.
How does this relate to shutter speed? Let’s assume the scene in question is a lone flower on an overcast day. Remember that your camera is set to ISO 200 and mine to ISO 100, both with an aperture of f/5.6. Therefore, when you adjust your shutter speed for a correct exposure, 1/250 sec. is indicated as “correct,” but when I adjust my shutter speed for a correct exposure, 1/125 sec.—a longer exposure—is indicated. This is because your 200 worker bees need only half as much time as my 100 worker bees to make the image.
Since this is such an important part of understanding exposure, I want you to put the book [ or electronic reading device] down for a moment and get out your camera, as well as a pen and paper. Set the ISO to 200. (Do this even if you’re still using film and have a roll in your camera that’s not ISO 200; don’t forget to set the ISO back to the correct number when we’re done here.) Now set your aperture opening to f/8, and with the camera pointed at something that’s well illuminated, adjust the shutter speed until a correct exposure is indicated in the viewfinder by the camera’s light meter. (If you want, you can leave the camera in Aperture Priority mode for this exercise, too.) Then change your ISO again, this time to 400, leaving the aperture at f/8, and once again point the camera at the same subject. Whether you’re in manual mode or Aperture Priority mode (indicated by the letter A or by Av, depending on your camera), you’ll see that your light meter is indicating a different shutter speed for a correct exposure. Once again, write down this shutter speed. Finally, change the ISO to 800 and repeat the steps above.
What have you noticed? When you changed from ISO 200 to ISO 400, your shutter speed changed from 1/125 sec. to 1/250 sec. or perhaps from something like 1/160 sec. to 1/320 sec. These shutter speeds are examples, of course, and without knowing what your subject was, it’s difficult to determine your actual shutter speeds, but one thing is certain: each shutter speed is close to, if not exactly half as much as, the one before it.
When you increase the number of worker bees (the ISO) from 200 to 400, you cut the time necessary to get the job done in half. (If only the real world worked like that!) This is what your shutter speed was telling you: going from 1/125 sec. to 1/250 sec. is setting half as long an exposure time. When you set the ISO to 400, you went from 1/125 sec.—passing by 1/250 sec.—and ended up at 1/500 sec. Just as each halving of the shutter speed is called 1 stop, each change from ISO 200 to ISO 400 to ISO 800 is considered a 1-stop increase (an increase of worker bees).
You can do this exercise just as easily by leaving the shutter speed constant, for instance, at 1/125 sec., and adjusting the aperture until a correct exposure is indicated in the viewfinder; or, if you choose to stay in autoexposure mode, select Shutter Priority, set a shutter speed of 1/125 sec., and the camera will set the correct aperture for you.
Related Articles

Exposure! – Julia Boggio’s New Book Set at Fictionalized WPPI
August 5, 2024
What do you get when you bring together thousands of photographers with big talent and big personalities in “Las Vegas, a place where anything can happen”? That describes WPPI — the largest photo conference in the world –- to a T, and in the keen writerly eye of Julia Boggio, the answer is “drama and romance.” Her final novel in...
More »
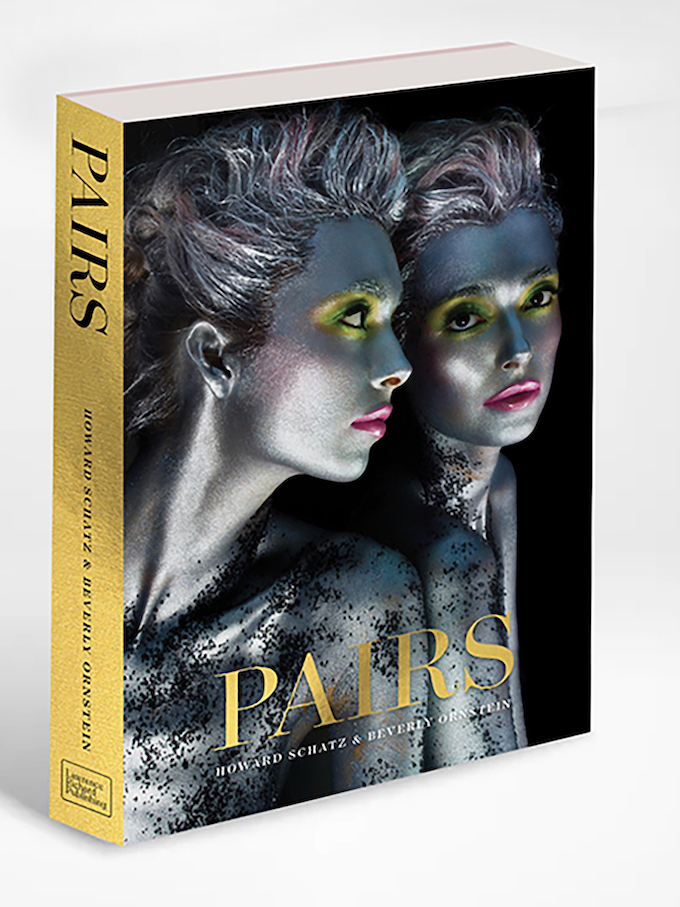
Howard Schatz’s 23rd Volume: A Photographic Pas de Deux
October 18, 2023
Versatile Howard Schatz Weighs In with His Latest Astonishing Monograph PAIRS by Howard Schatz and Beverly Ornstein Lawrence Richard Publishing 403 Pages. 365 photographs $40.00 This twenty-third entry in Howard Schatz’s tally of published books shares a lot in common with his earlier collections. His latest, Pairs, out this month, brings into focus the most important trademarks of this gifted photographer’s vast body...
More »

Photo Books: Compelling New Titles for Spring 2023
April 12, 2023
Freshen up your coffee table this Spring with fresh photo books. Michael Chinnici’s Vanishing Cuba: Curated Photo Storytelling Collection is a rhapsody on the beauty, culture, and stories of Cuba. Movement at the Still Point is celebrity photographer Mark Mann’s pandemic project, where he captures images of dancers in motion and also captures their still portraits. Finally, Ernst Haas: The American...
More »
