
Software Review: PictureCode’s Photo Ninja
July 11, 2016
While a few post-processing programs with big marketing budgets capture most of the news, there are other smaller, more specialized programs that deliver results that rival those of their better-known peers. Photo Ninja is a standalone and plug-in RAW file processing program, which can also process TIFF and JPEG files, and a worthy rival to Adobe Camera Raw. Version 1.0 was released in 2012, an outgrowth of PictureCode’s excellent Noise Ninja noise reduction software, three versions of which are incorporated into Photo Ninja for different purposes.
Also incorporated in Photo Ninja is a catalog-free image browser. The browser allows you to view image files anywhere on your computer, including network or removable drives. It also lets you apply ratings, rename, rotate, delete, duplicate and other typical browser actions. Double-clicking an image in the browser opens it in the Photo Ninja Editor module. Adjustments (Photo Ninja calls them “filters”) appropriate to the RAW, TIFF or JPEG image—based on camera model, ISO, image contrast and other analyzed properties of the image—are automatically applied. You can program these automatic adjustments to suit your personal needs. You can open any of the filters and change the automatic adjustments as well as open other filters and copy and paste edits from one image to others. Batch processing of images to TIFF or JPEG output formats is easily done.
Editions of Photo Ninja are available for 64-bit Mac and 32-bit and 64-bit Windows platforms. The $129 price for the download of the perpetual license includes one year of free upgrades. If there is an upgrade you want to install after the first year, another year of upgrades is available for $59. Included in the program is the plug-in installer for Adobe Photoshop and Adobe Photoshop Elements. You can set up Photoshop to bypass Camera Raw and edit RAW, TIFF and JPEG files directly in Photo Ninja. And you can also access Photo Ninja through Lightroom and Photo Mechanic if you set it up as an external editor.
User Friendliness
You access the two modules in Photo Ninja, the Browser and the Editor, from the menu bar above the preview image. The interface is clean and simple in the style of current imaging software. Unlike other programs, the filter adjustments panel is located on the left of the image rather than the right. While it cannot be moved, many other aspects of the interface are user-adjustable, making Photo Ninja easy to learn and straightforward to use. The documentation included and the excellent tutorials on the PictureCode website speed you through any learning curve you may have.
While Photo Ninja contains camera profiles for hundreds of digital cameras, advanced users can create camera profiles for their specific equipment at different ISOs and lighting conditions using standard ColorChecker targets. The documentation explains this simple process. PictureCode plans on creating a repository on its website to which users can upload camera profiles they have created and other users can download them. The version we tested contained the profile for a Nikon D5 and compressed RAF files from the Fuji X-Pro 2, so the program is kept up to date with camera releases.
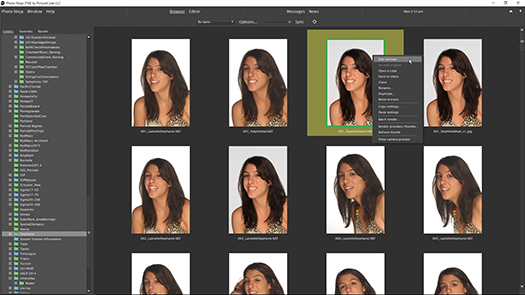
Photo Ninja includes a file browser with all of the file management abilities you would expect. Photo © Stan Sholik
What We Liked
While I am always skeptical of software that makes automatic adjustments, the science behind Photo Ninja works extremely well. And you can set up the automatic adjustments with the settings you feel best represent the look you’re after. Presets are included for neutral rendering as well as several options for portraits, landscapes and monochrome. These are editable and can be saved for use in the future. I particularly appreciated how I could link the highlights slider to the exposure slider and have the highlights automatically adjusted while I changed the exposure. And I could unlink them if I wanted to make separate adjustments.
For most portraits, rather than having to deal with an array of sliders, you use the Detail slider in the Exposure and Detail panel. While it seems like a clarity slider in other software, moving it to the left to soften skin does not soften fine detail such as hair and eyelashes.
And then there is Noise Ninja. It is one of the very best noise reduction programs available, and in my opinion, the easiest to use. Following the simple recipe in the documentation delivers excellent results with no contrast buildup or artifacts (check out the photo gallery for samples of some before/after shots). Choosing which of the three versions of Noise Ninja to apply depends on your needs. Version 3 gives faster results but raises the chances of stairstepping, version 4 yields more 3-dimensional results with more detail but slower processing, while version 4 Turbo produces results similar to version 4 but with slightly faster rendering. I settled on version 4 Turbo as my default.
What We Didn’t Like
I found nothing to dislike with the output images from RAW files processed in Photo Ninja. As I don’t shoot TIFFs or JPEGs, I didn’t spend much time testing them. As expected, a few of the filter adjustments only work on RAW files. What I found frustrating was the need to click “Apply” in each of the filter panels before I could move on to the next filter. I would have preferred the individual filter panels to open on the right of the preview, allow me to make adjustments that are automatically saved, then choose the next filter on the left, have its panel open on the right for adjustments, etc. And I would have liked more keyboard shortcuts, or the ability to create them for power users.
While I realize everyone’s workflow is different, there are some features found in other programs that I miss in Photo Ninja. One is the lack of RGB readouts, either as percentages or absolute values. A histogram and highlight/shadow warnings don’t provide me with the detailed information I would like. Also, output file size is currently limited to powers of 2 (i.e., 1:1, 1:2, 1:4, etc.) making it impossible to output an 8 x 10 or 5 x 7 TIFF or JPEG with the correct dimensions. And for those of us that shoot events with multiple cameras or multiple photographers, Photo Ninja lacks the ability to sort images by capture time.
And while I found Photo Ninja far faster to use than Lightroom and Camera Raw, the speed comes at the expense of not updating the thumbnails and previews if you copy and paste adjustments from one image to others. Not such a big deal perhaps, and there is a menu option to do this, but I found it confusing at times.
How It Compares
Never having been a big fan of Camera Raw accessed through Photoshop, I process RAW files from client assignments in Capture One and from anything else I shoot in Lightroom, which uses the same processing engine as Camera Raw when they catch up with one another. There is no question in my mind that Photo Ninja does better RAW file processing than either Lightroom or Camera Raw. This is especially noticeable with the high-contrast concert stage images I am often called upon to shoot. Photo Ninja does a better job than its rivals when it comes to preserving tone and believable color in highlights. Photo Ninja is also better able to dig information out of shadows and successfully remove the noise without creating artifacts or the purple tint I often find in other software. My comparison with Capture One is far less conclusive, but that is comparing a $299 program with a somewhat steep learning curve to the $129 Photo Ninja that’s far easier to use, even if it lacks all the features of Capture One.
If I were using a non-Creative Cloud version of Adobe photography software and shooting RAW files, I would buy Photo Ninja immediately. As it is, I am going to follow the PictureCode instructions and make Photo Ninja my default RAW file processor in Photoshop.
Stan Sholik is a commercial/advertising photographer in Santa Ana, CA, specializing in still life and macro photography. His latest book, Shoot Macro, for Amherst Media, is now available.
Related Articles

Adobe Max Roundup: Exciting New Features
October 19, 2023
Adobe Max, the company’s annual creativity conference, has just ended, leaving the latest innovations and features across Creative Cloud. You can revisit many of the keynotes and presentations on the Adobe site, but we’ve put together a quick overview of some of the most exciting photo and video news. Lightroom Most of the new features are available for all Lightroom...
More »

Nikkor Z Releases New Lenses & Tether Tools Updates Software
June 30, 2023
Nikon Z 70-180mm f/2.8 Good news for Nikon Z shooters! Nikon has added two new lenses to its Z-series line: the Nikkor Z 70-180mm f/2.8 and the Z 180-800mm f/5.6-6.3 VR. While the latter is best left to wildlife and sports photographers, we think that the Z 70-180mm f/2.8 model looks like a solid lightweight alternative to its more established...
More »
More Mobile Apps? Yes, Please.
May 31, 2023
Most of us have dozens and dozens of apps on our mobile devices. Some are opened every day; others may be specialized and used less frequently. Of course, there’s always a handful that lay dormant until we decide to clean up our screens. But, let’s face it, technology changes rapidly and as do our needs, so there’s always room for...
More »
