
Lighting
Harsh Light Photography: How to Work It and Love It
July 19, 2022

Harsh light photography can be quite challenging for many photographers to take on. And it certainly can be when you approach it just the way you would approach photographing with flat light or even golden hour light. Now, in my seventh year of shooting portraits for my families as well as my commercial clients, I often seek out harsh light to bring that something extra and add some fun contrast and depth to my work. When taking into account a few considerations for composition along with some perspective play, shooting in harsh light can become not just easy to handle, but may just become your favorite light to shoot in!
Technical Considerations For Harsh Light Photography:
1. Exposure settings
Working with harsh light can mean you are blowing your highlights super fast. You are shooting under bright light, or there could be pockets of light or direct sun, so it’s imperative to get your exposure settings as close to “final” as you can. Always keep in mind, that once your highlights are blown out (watch your histogram on your camera if you need help with that), you simply cannot recover them. I always like to under-expose my images when shooting in harsh light because the details in the shadows may not be as important as the detail in the highlights area especially if I am going for a dramatic, moody portrait.
[Read: How to Find Creative Photography Inspiration in 7 Steps]
Sample settings to start with: Adjust your shutter speed and f-stop as required based on where you are shooting—i.e.open area, dappled light space, etc.—and start with ISO 100. I always start with 1/400 of a sec., f/4.0, and then go up or down from there when shooting in harsh light.

2. Lens considerations
Traditional lenses: Shooting with a 35mm lens is great for high/low shots to get some fun angles and interesting perspectives for portraits, while the 85mm or 105mm can also help to block out distracting backgrounds and give a nice compression. My favorite go-to lens when shooting in harsh light, however, is the 35mm for its versatility and ease of use in any changing lighting situation.
Lensbaby and manual lenses: Lensbaby lenses are my favorite to use in any lighting situation I am working with, be it harsh light or beautiful golden light. However, when used in a harsh lighting situation it really helps to “block” out the harshness of the light while softening it, making it appear dreamy and out of focus while bringing the focus back just on your subject! Other manual lenses work very similarly and can produce dreamy images by introducing blur.
[Read: Tips to Shooting Creative Window Portraits Using Only Window Light]
Remember, your lens choice can make a even more of a difference when shooting in harsh light (considering you want a flattering but also fun harsh light portrait).
3. The importance of Perspective.
The angle of the sun is important and you always need to look for it with respect to your subject. Placing your subject with the sun behind them during midday light may produce harsh shadows underneath their eyes (raccoon eyes) when shooting straight on (eye-to-eye) to your subject. Playing in with some perspective, however, can help you balance the light out and avoid or hide the harshness of the shadows (especially when they are unflattering on your subject).

4. Compositional Ideas for working in harsh light.
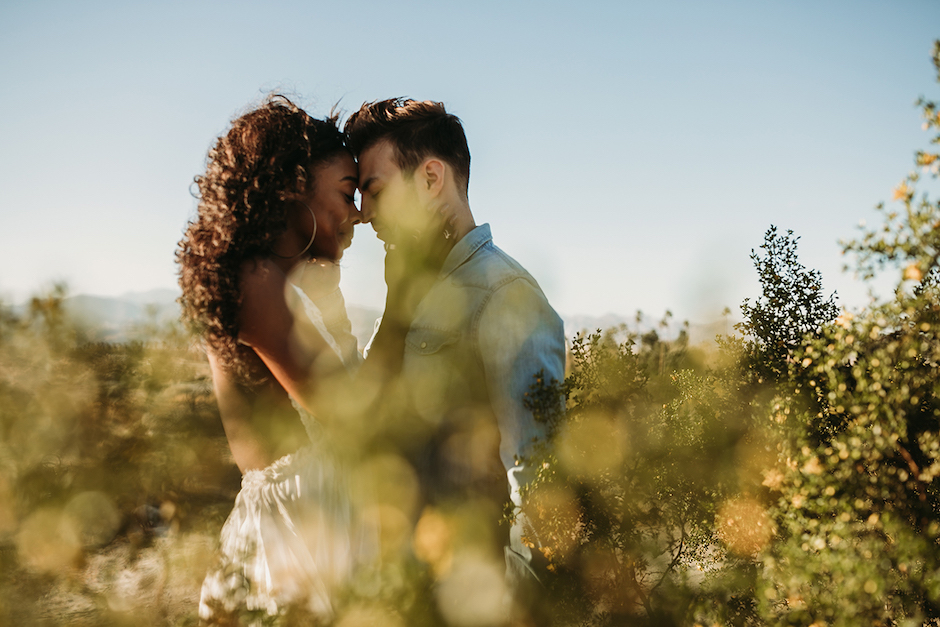
One of my favorite tips to “pose your model/subject” in a harsh lighting scene is to angle them/their body such that it’s actually facing the sun but you get a nice profile shot of them. Angle them to look at the sun in such a way that their heads are slightly lifted and facing towards the sun and count to 3 and ask them to open their eyes so that they don’t squint. You could also have you subject close their eyes instead. You may see shadows from their lashes on their cheeks, which is nice (see image below).
Shoot from down low by tilting your camera upward while keeping your subject’s face and body angled still. Look for lines and shapes that are created naturally by the subject. This can create some interesting angles and add some fun back into your portraits!
[Read: Traditional Portrait Photography Rules and How to Break Them]
Play with depth of field and use hands, trees, leaves, or any other props close to the camera to create depth while the subject is at an angle.
Play and experiment with movement by slowing down your shutter speed to 1/100 or even lower to 1/80 and compensate for that with your f-stop as needed. This will introduce blur and movement in your image. Use it with intention to create a story or narrative.
5. Open spaces with full sun.
Shooting in open spaces can be fun and interesting and the beach is a great location to play with full sun portraits! The sand, being light, along with the sky being bright and wide open naturally acts as a big diffuser and hence full sun in an open space can actually make for some fun portraits.


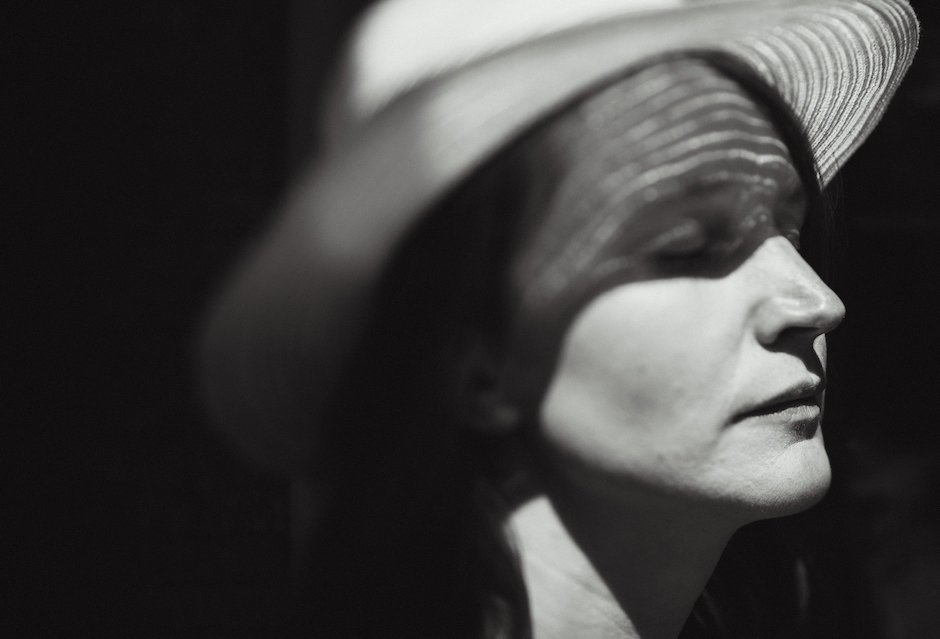
6. Embrace the shadows.
Full sun can lead to a lot of opportunities to play with shadows and create some interesting images with added contrast and depth. The key here is to watch the balance between the highlights and the shadows so that you don’t overexpose the highlights nor have clipped shadows. Looking at the histogram can help you with that.
[Read: Best Natural Light for Photography: 5 Types and Tips]
Dappled light is another way to bring in some contrast to your harsh light work. Make sure to place your subject (whatever you might be shooting) in that pocket of light and expose for those highlights. You might have to under expose by 1-2 stops than you usually shoot with to make sure your exposure is properly balanced.

7. Shoot with color in mind.
Harsh light can bring in some pretty saturated color, especially if you are shooting in an area with a lot of color and shapes. You can play that to your advantage by using some funky color to your images to make them stand out!


8. Shoot with B&W in mind.
Harsh light can give you dramatic results when you plan to convert the image in B/W during the conceptualization of the shot. Due to the high tonal range of light when photographing in harsh light situations, those images convert beautifully to B/W images as well. The contrast between the highlights and shadows in that scene can make for some stunning conversions.
Harsh Light Photography: The Bottom Line
Harsh light photography doesn’t have to be scary at all. With a little prep work and taking the time to observe your surroundings, the light, the lines and the colors in the space you are shooting at, you can produce some stunning creative images that have contrast and add depth to your work. Harsh light photography doesn’t have to be something you do for every single shoot you do; but it can be FUN and CREATIVE for when you are looking for something different and are tired of working with the same kind of light day in and day out!

Jyotsna Bhamidipati (Jyo) is an electrical engineer as well as an award-winning, published fine-art and lifestyle photographer. The mentor/educator is based in Sacramento, California, and recently spoke during a sold out class at WPPI 2022 on Befriending Harsh Light. She is a lover of light and shadows and seeks to capture the everyday perfectly imperfect beauty around her.
As a thank you to our readers, we’re pleased to offer you a Rangefinder exclusive discount code to get 25% off The Portrait Masters course below. Use the code RF25 at checkout to redeem. This code cannot be used in combination with other sales.
Related Articles

The Hobolite Micro—Perfection in a Pint-Sized Package
September 26, 2023
Form and function are perfectly matched with Hobolite’s latest release, the Hobolite Micro. This diminutive, bi-color, battery-powered LED light takes some of its cues from the company’s larger, more powerful siblings but doesn’t skimp on features. Yet it’s small enough to fit in the palm of your hand—or anywhere other lights are too bulky to fit, a special bonus for...
More »
How Francisco Joel Hernandez Adds Depth to His Portraits
March 6, 2023
WPPI 2023 speaker Francisco Joel Hernandez has been a fan of off camera flash for over a decade and loves sharing his process on social media.
More »
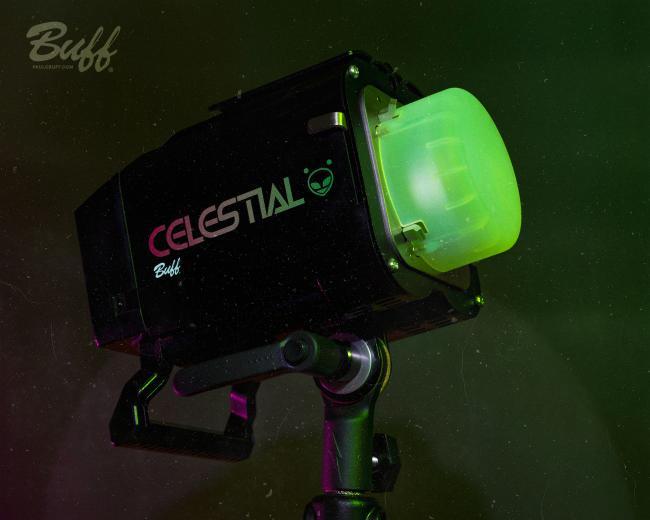
Paul C. Buff’s Celestial is a Powerful Battery-Powered Strobe
January 5, 2023
Lighting Company Paul C. Buff is best known for its studio lights—such as the Alien Bees and Einstein—but the company’s latest strobe is entirely battery powered. Arriving on Jan. 20, the Celestial is a battery-powered flash with up to 500 Ws of power and features like High Speed Sync. The Celestial: Battery Power Paul C. Buff’s Celestial delivers up to...
More »
