
Illuminating the Layers of a Composite Photo
January 18, 2016
One of our favorite photographers, Ryan Brenizer, introduced us to composite images a few years ago. One look at his innovative wedding party shots and we were hooked. Great composite images are rare and difficult; they require foresight, creativity, patience and trust from your clients.
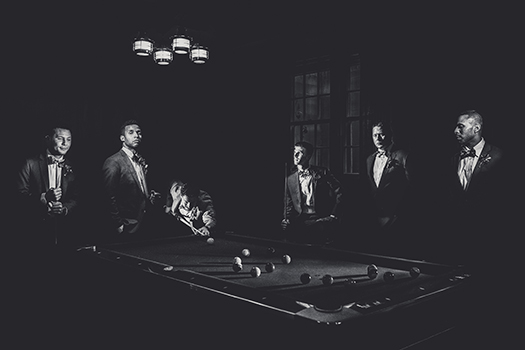
This groomsmen composite comprises seven different images shot with a MagMod grid. Photo © Seth and Beth.
The Atmosphere
One ideal element for us in composites is darkness. We love shooting in the dark because it allows us to completely control the mood of the image and how the light hits our subjects. Instead of letting the ambient light control how a photo might look, we can control everything with one off-camera flash in a dark setting. When we find a dimly lit room, we get excited about the possibilities.
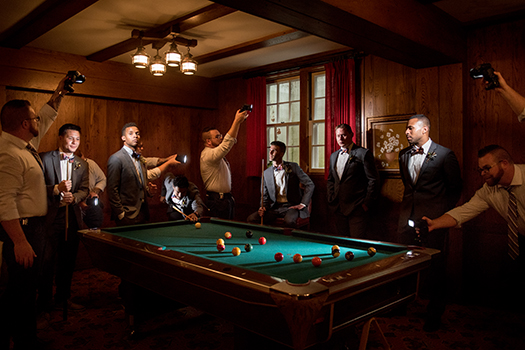
This is what the scene in the pool hall actually looked like, as Seth lit while Beth shot. Photo © Seth and Beth.
The Action
We typically begin our composites with a pep talk, and we tell the group that what follows might seem a bit out of the ordinary. This particular composite image contains seven separate photos. The groomsmen were positioned and posed to basically look just plain awesome—a little James Bond with a hint of Mad Men mixed in. The groom was made camera aware to push the emphasis toward him. We instructed the guys to get comfortable and remain completely still. Beth operated the camera with the tripod while Seth maneuvered around the men, lighting each one of them with a handheld flash. The flash was equipped with our favorite modifier, the MagMod grid, which drastically concentrates the flash beam for maximum control and minimal light spill. When we were done, we congratulated them for being so cool and they wondered what just happened.
The Assembling
Once we get home to Lightroom, we collect the seven images and begin the edit, which can take about 5 to 10 minutes. Our preset is applied to each image and a quick dodge-and-burn brush is used to get the proper exposure on each subject. The images are then opened as layers in Photoshop, and a quick auto-alignment is performed to straighten any camera movement. With the layers stacked on top of each other, the top layer is activated and the eraser brush is used to erase a vacancy, which allows the layer below it to magically appear. In other words, the second subject appears in the top layer above him as that layer is erased. This step is repeated until all illuminated subjects can be clearly seen and there are no signs of the light source (or the person holding the light). Final dodging and burning is done in Photoshop to hide distractions and highlight the subjects.
For Seth and Beth’s quick list of Tips for Triumphs, click here.
Related Articles

Fine Art School Portraits: Get Started Today!
April 18, 2024
In my fourteen years of growing my custom portraiture business, one venture stands out as exceptionally beneficial: the launch of my Fine Art School Portrait service. Providing Fine Art School Portraits for select Seattle area schools not only brings in significant profits, but it also keeps my portrait bookings steady and eliminates slow seasons. Having photographed thousands of children ranging...
More »

In One’s Own Skin: Beautifully Real Self Portraits
April 17, 2024
I’ve long felt disenchanted with the contrived. I suppose that’s why I took a bit of time away from self portraits. It’s more challenging to capture something natural, authentic, and less curated when first you have to set up your camera, establish your camera settings, and get into place. Recognizing that self portraits have always been the catalyst for evolution...
More »

Master Natural Light Photography with Nikki Closser
April 11, 2024
When you master natural light, you can create amazing images in virtually any lighting scenario Mother Nature sends your way. In her portrait photography career of ten plus years, Nikki Closser has found that using the natural light of the sun is the easiest and most efficient way to create warm and authentic portraits, and she shoots 90% of her...
More »
