
4 DIY Photo Projects to Try at Home
September 23, 2013
Photographers know more than anyone how expensive it can be to survive in this industry—you have to shell out at least $1,000 for an entry-level DSLR, and even that is a bargain. But you don’t necessarily have to pay the big bucks to get the best shots—in fact, you can often make gear yourself! Rangefinder asked for some of the most fun, doable projects from an array of contributors to Photojojo, the spunky San Francisco-based photo blog that offers tips, tricks and a weekly DIY newsletter. From using an old film canister as a flash diffuser to making photo light stencils shine at night, these projects will make you wish you knew this stuff a long time ago.
Film Canister Flash Diffuser
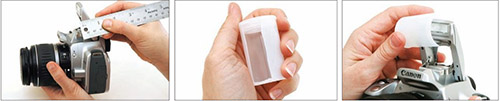
No need to run out and get a professional flash diffuser, says photographer Kelly Jensen. A film canister can do the trick.
.jpg)
© Kelly Jensen
“The film canister diffuser gets rid of that glare you get on people’s faces,” she says. “It makes them look less shiny and it softens shadows, too.” Jensen makes certain to keep one in her film bag at all times, using it mostly for her personal work. “And it takes up a lot less space than a flash unit,” she adds. “It’s a nice little solution.”
Duration: 5 minutes
Difficulty Level: 1/5
Materials:
Camera with a pop-up flash
White film canister (sometimes local photo labs will have extras)
X-acto knife
Ruler
Marker
Here’s how:
1. Measure the length and width of your pop-up flash.
2. Remove the cap from your film canister and mark the same measurements, starting from the cap side.
3. Carefully slide your knife along the marks you’ve made to make a notch in your canister.
4. Slide the canister onto your pop-up flash and snap the lid back on to secure your new diffuser in place.
© Kelly Jensen
TIPS:
- Err on the smaller side when cutting your canister.
- If your notch is too big, use tape to secure it in place.
3-Ring Binder Light Tent
.jpg)
© Chris Rutter
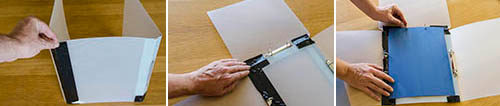
After two decades in the photo industry, UK photographer Chris Rutter got tired of inconsistent outdoor macro shots. When it’s a bright, sunny day, it isn’t easy to capture detail in both the highlights and the shadows. It became obvious to make a portable light tent that would diffuse the light around his subject, says Rutter. “This would allow me to create studio-style shots without having to uproot the subject and take it back to my [in-house] studio,” he explains.
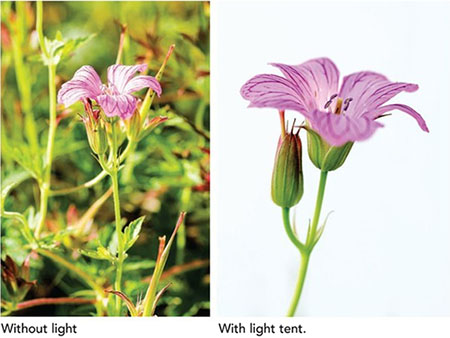
Three-ring binders are just robust enough to stand on their own, cheap enough to buy multiple and compact enough to be portable.
Duration: 30 minutes
Difficulty Level: 2/5
Materials:
Three 8 x 12-inch white translucent 3-ring binders
Colorful construction paper (optional—see step 4)
Tape
Scissors
Hole-puncher
2 or 3 binder clips
Camera
Here’s how:
1. Overlap the front cover of one binder onto the back cover of a second so that you see three panels, and tape them together.
2. Cut a cover off the third binder and tape the long side above the center panel of the light tent.
3. For an alternative background to the translucent white, hole-punch the edge of a piece of colorful paper to slide through the rings of your light tent’s binder.
4. Snap binder clips onto the bottoms of the light tent—they will weigh it down so it won’t fall over if a breeze blows through and will prop it up on a flat surface.
5. Carefully place the finished product around your macro subject, and position the camera to shoot through the opening of your light tent.
© Chris Rutter
TIPS:
- Too much tape on the light tent may create bumpy shadows, so spread it evenly and sparingly.
- When you’re ready to shoot, start with an aperture of f/5.6, which will throw the background out of focus.
Walk-in Pinhole Camera
Photojojo photographer Margo Duvall is no stranger to pinhole cameras—she has her own set of handheld ones—but there’s nothing quite like a walk-in pinhole camera. And after visiting the giant walk-in camera obscura stationed in San Francisco, she decided to try it out for herself. “It has that wow factor,” Duvall says. “If people are walking around in the scene you’re projecting, you’re like, ‘Wow, that’s really what’s going on out there!’”
.jpg)
© Margo Duvall
Duration: 1 hour, depending on the size of the room and the number of windows
Difficulty Level: 3.5/5
Materials:
Black tape (preferably electrical tape, which won’t rip paint or wallpaper off your walls)
Flashlight
Aluminum foil
X-acto knife
White sheet (optional—see step 2)
Camera and tripod
Here’s how:
1. Pick a room with a closeable door and a window that faces a flat wall.
2. If the wall isn’t white, pin up a white sheet as flatly as possible.
3. Cut out a 5 x 5-inch piece of aluminum foil and poke a hole in it. This is your lens, so the smaller the hole, the sharper the image. Feel free to make a few different lens sizes to experiment.
4. Cut a 4.5 x 4.5-inch square out of a piece of black poster board or paper, and tape your lens over this cutout securely on all sides.
5. Position this piece of paper on the window opposite your white wall or sheet and tape it in place. Cover remaining windows with black paper, taping all sides to ensure no light slips through.
6. Bring your camera and tripod into the room, close the door and turn off the lights to check for remaining light, such as under your door. Cover everything as necessary.
7. Turn off the lights again. The image (which projects upside down) will appear instantly, but your eyes may need a minute to adjust.
8. Set up your camera and tripod. Longer exposures will capture the image better—Duvall set up her Canon 5D Mark III for an 8-second exposure (just long enough for her dog to be slightly transparent after sitting for a portrait halfway through) at f/4 and ISO 500.
.jpg)
.jpg)
TIPS:
- Choose your room wisely—the pinhole works best if the image projects harder edges and lines, such as buildings.
- The image you see depends on the position of the lens. If there’s too much sky, try lowering the lens.
Photo Light Stencils
.jpg)
© Margo Duvall
Before Photoshop there were light stencils, a photo technique that inserts an image or design onto a real-life scene, often producing magical or sometimes ghostly effects. After seeing a street artist in New Zealand demonstrate photo light stencils, Margo Duvall had to try them herself. You can cut out your own stencil, but Duvall shows us how to use a printed image to light the night with a homemade lightbox.
.jpg)
© Margo Duvall
Duration: 1 hour (20 minutes for box assembly)
Difficulty Level: 4/5
Materials:
Cardboard box
Cardboard cutter
Ruler
Marker
Black tape
9 x 12-inch laminate sheets (available at office
supply stores)
Printed images on black backgrounds (see steps 8 and 9)
External flash
Camera and tripod
Here’s how:
1. Cut a rectangle out of the bottom of your cardboard box that measures slightly smaller than the image you plan to print.
2. For each side of the box, center your flash at the top and draw diagonal lines from either side of it to the corresponding bottom corner of the box. Cut along these lines.
3. Fold the cardboard pyramid-style, and tape each of the sides together with black tape. This is your lightbox.
4. Cover the outside and all edges of the lightbox with black tape. The inside of the box can also be blacked out, but it isn’t necessary.
5. From your excess cardboard, cut a strip that measures roughly 2 x 10 inches and cover it in black tape. This is your handle. Tape it on the side nearest the flash cutout.
6. Find an image with a distinct shape, and use Photoshop (or similar software) to blacken the background.
7. Print out two copies and stack one on top of the other. Carefully tape the edges together, and laminate both sides. Cut off excess lamination, but leave a little bit of edge to work with.
8. Tape your laminated image onto the larger cutout of your lightbox so that the image is facing outward. Your black tape must cover up any borders that may let light leak in.
9. Set up your camera and tripod at your chosen location. Hold your lightbox in the scene, and with your camera focused on the image, start your exposure, pop the flash to expose your light stencil, and move out of the frame quickly. Take a look at how it turned out, and adjust your settings as necessary.
.jpg)
TIPS:
- If you see a black rectangle around your image (from your lightbox), either turn down your flash power or scale down your aperture. If the background is too dark, bump up the exposure time.
- Try popping the flash multiple times in different places in one exposure.
- Duvall’s image was printed in black-and-white, but see what you can do with a color image—you may be able to get some pretty cool effects!
Related Articles

Guide to Photographing Weddings in Cathedrals and Temples
April 23, 2024
Photographing weddings in dark indoor environments like cathedrals, temples, and other religious structures present unique challenges and opportunities for photographers. The low light, the intimacy of the venue, and the solemnity of the moment require a delicate balance between technical skill and creative vision. This guide is designed to help photographers navigate these challenges, ensuring that every shot reflects the...
More »

Fine Art School Portraits: Get Started Today!
April 18, 2024
In my fourteen years of growing my custom portraiture business, one venture stands out as exceptionally beneficial: the launch of my Fine Art School Portrait service. Providing Fine Art School Portraits for select Seattle area schools not only brings in significant profits, but it also keeps my portrait bookings steady and eliminates slow seasons. Having photographed thousands of children ranging...
More »

In One’s Own Skin: Beautifully Real Self Portraits
April 17, 2024
I’ve long felt disenchanted with the contrived. I suppose that’s why I took a bit of time away from self portraits. It’s more challenging to capture something natural, authentic, and less curated when first you have to set up your camera, establish your camera settings, and get into place. Recognizing that self portraits have always been the catalyst for evolution...
More »
