
Bright Lights, Big Impact: Breaking Down 4 Setups Behind Signature Styles
April 15, 2015
![]()
Photo © Christian Lalonde
1. BUMPING UP DAYLIGHT—Christian Lalonde
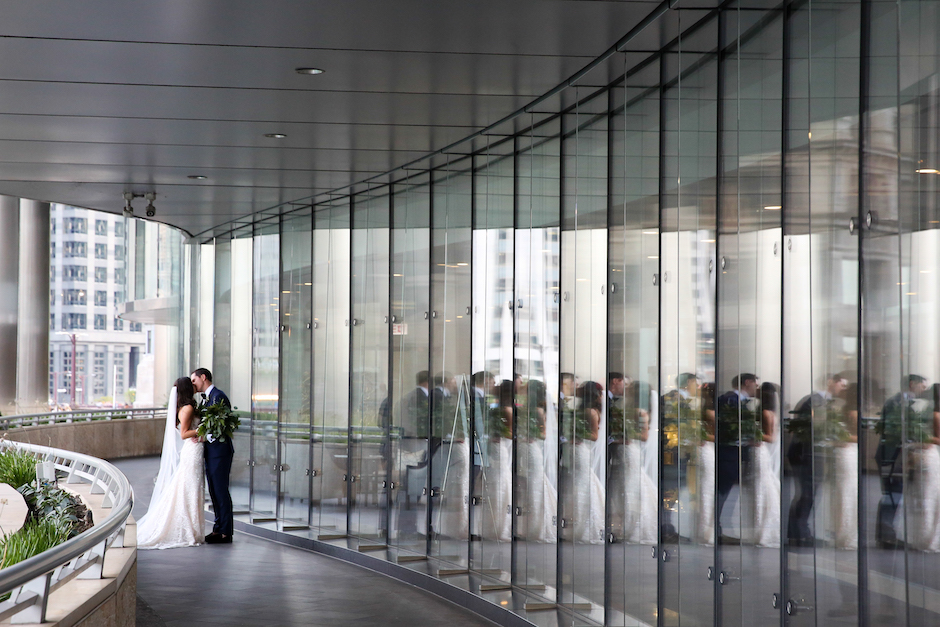
While commercial photographer Christian Lalonde (of Photolux Studio in Ottawa, Ontario) is well-known for his extensive composites, layered images and vibrant pops of color, sometimes a more straightforward image like this one (above), can be just as challenging. Shot in the lobby of a hotel in Toronto, this image was part of a series depicting a week in the life of living at a hotel. This particular shot, Lalonde explains, was used to illustrate the couple heading out for a day of shopping and enjoying what Toronto has to offer. “It was shot in the late afternoon but lit to look like it was mid-morning on a bright sunny day,” he says. To achieve a final look of what Lalonde refers to as “more natural, balanced lighting,” a main light was placed behind the metal curtain (and desk clerk), another light behind the couple left of the piano, and yet another light was set up to the right of them, illuminating the piano bench.
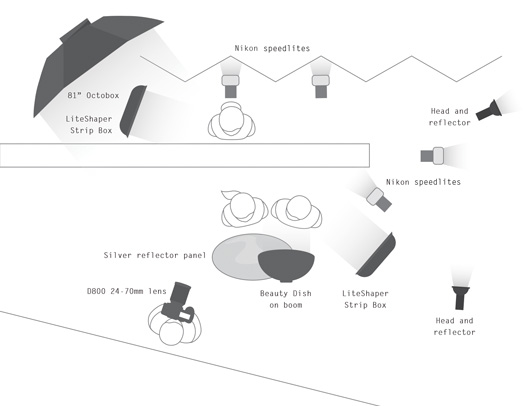
“There’s a strip light coming in on the man’s right side and then another strip light coming in on the left of his female partner, and then there is a beauty dish up top and a silver fill card on the ground, just to make the eyes pop a bit and create a little bit of flaring off the ground,” Lalonde explains. “There’s also an extra fill light just above the left side of the camera. And because the walls where all white, I was able to use my environment, especially the elevator wall behind the camera, as a natural fill.”
Another challenge in an image like this, he adds, is to have a natural interaction between the couple. “Because we’re using strobe, the challenge is creating movement with a frozen image,” says Lalonde. “Like with the woman’s red jacket and the way it falls behind her, you see and feel a bit of movement coming into it. In terms of the lighting, it all comes down to creating that drama and movement, even subtly.“
CAMERA: Nikon D800 LENS: 24-70mm EXPOSURE: f/8 at 1/125 ISO: 100
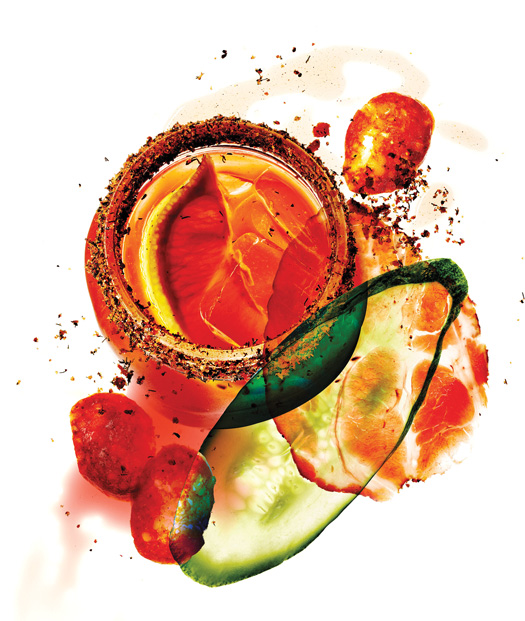
Photo © Christian Lalonde
Bottoms Up
For this shot of a specialty drink that ran as part of a feature on different restaurants in Ottawa Magazine, Lalonde backlit the image by building a light table and using three different lights on the ground, as well as semi-transparent Plexiglas over the top of the table. “I also used a ring light on the camera, just over the lens, and a little strip box on the side to get a bit of directional lighting,“ he explains. “The ring light helps create the highlights over the drink, and a silver reflector creates more highlights within it.” As part of his signature style, Lalonde shot each element separately and then they were individually processed in Capture One and assembled in Photoshop, with just a bit of final processing in Camera Raw as a final touch. “It may seem like kind of an odd way of doing it,” Lalonde says, “but that’s just how I do most of my images.”
LOCATION: Toronto, Ontario, Canada CAMERA: Hasselblad H2D-40 LENS: Hasselblad HC 80mm with closeup adapter EXPOSURE: f/11 at 1/250 ISO: 50
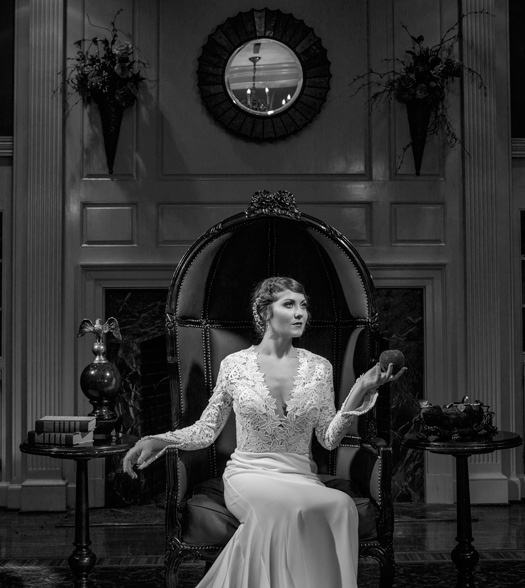
Photo © Pete Wright
2. BRIDE FATALE—Pete Wright
Drawn to the classic look of black-and-white photography, Pete Wright’s love for George Hurrell’s 1930s and ‘40s Hollywood glamour shots propelled him into a curious genre: film noir portraits. The Richmond, Virginia-based wedding and portrait photographer—with a book set for release in June called Cinematic Portraits (Amherst Media)—doesn’t hesitate to point to Hurrell’s timeless work as profound inspiration for his own endeavor into film noir, which he began shooting back in 2007 for a personal project (before receiving various requests from wedding parties).
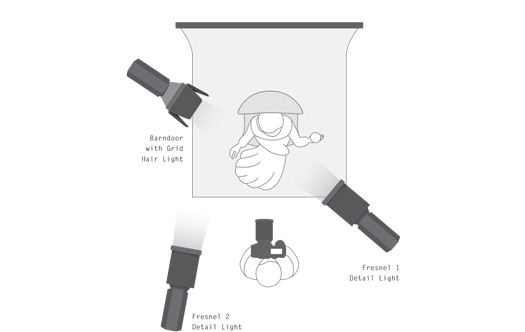
Dramatic lighting and elegant posing is how it’s done, Wright says. This image (above, shot for Wedding Planner Magazine) called for a three-light setup with Bowens Gemini 1000Pro strobes and built-in PocketWizards. Two Bowens Fresnel 200 modifiers were placed in front of the femme fatale bride: Wright set the main light on her wide open and the other one, shining on the table next to her, closed “way down,” he says, “for a small, controlled beam of light that won’t affect the rest of the scene.” Wright installed a barndoor light with a honeycomb grill behind her and opposite the main light to illuminate the crown of her head. “Because of the nature of the chair having a high and enclosed back,” Wright explains, “the bride is sitting closer to the edge of the front of the chair so that the hair light can hit her. When I fired, I dragged the shutter at 1/40th of a second to pick up more of the scene.”
LOCATION: Wyndham Virginia Crossings Hotel CAMERA: Canon 5D Mark III LENS: 24-70mm f/2.8L EXPOSURE: f/5.6 at 1/40th of a second ISO: 100
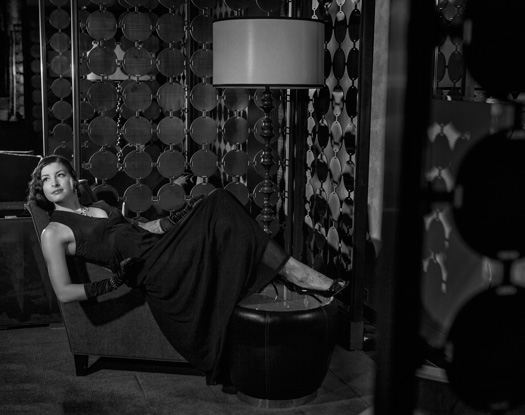
Photo © Pete Wright
The Dark Secrets: Film Noir Tips
Steer clear of softboxes. The lighting’s got to be hard and purposeful to get those theatrical shadows.
Place your models in the scene first, and then build the light around them. Wright likens the process to having an oil painting done—the lighting is so precise that reposing subjects means repositioning everything.
Practice patience. “Photographers tend to want to fire off thousands of images, but film noir portraits take time,” Wright says. “Get used to the idea of only getting a few images per hour.”
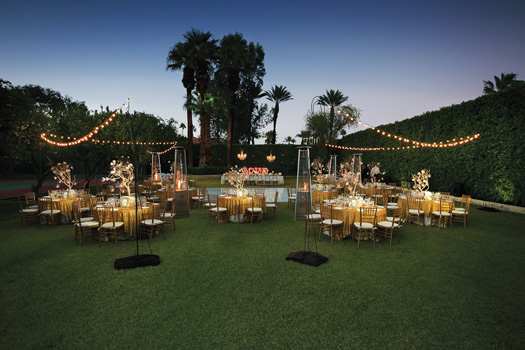
Photo © Callaway Gable
3. VIDEO LIGHTING STILLS—Brian and Allison Callaway
To capture this picture-perfect detail shot of a reception site at dusk, Los Angeles photographers Brian and Allison Callaway of Callaway Gable quickly assessed the difficult lighting situation and came up with a plan. The sun had already set behind the location they needed to shoot for their clients, and for the wedding planner. The natural light was muddy and the couple had expressed disappointment over yellow patches in the grass that they thought would show up in the pictures. In response, the Callaways decided to use their Switronix Torch LED video light and take five separate images that could be seamlessly stitched together in post production.
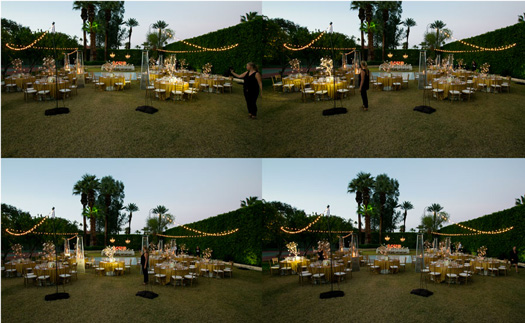
Four separate images show how Callaway Gable lit sections of the reception site, which they then stitched together in post.
First, Brian mounted his Canon 5D Mark III camera with a 16-35mm lens on their Benro aluminum tripod. Wanting to shoot at the lowest ISO possible to get crisp results, and needing to shoot at a mid-range aperture or higher to get the scene in focus from front to back, he set his f-stop to 7.1, his ISO to 1600, and his shutter speed to 1/25 of a second. Meanwhile, Allison matched the ambient light using the variable temperature feature on their Switronix and lit each table separately, as Brian lined up the photos for stitching together later. Total time from concept to execution? Just three minutes.
Once back in their studio for post production, the Callaways say, “We layered the five images on top of each other in Photoshop, and painted in each lit table to the main image using masks. Then we turned the yellow grass to green and the sky to a deeper blue using channels and selective coloring. The final step was a quick run through AlienSkin Exposure to give the image some warmth and depth.” In less than 15 minutes—including post production—they created an image that their clients appreciated and the wedding planner was able to use for publication.
LOCATION: Sandacre Estate, Palm Springs CAMERA: Canon 5D Mark III LENS: 16-35mm AT TK EXPOSURE: f/7.1 at 1/25th of a second ISO: 1600
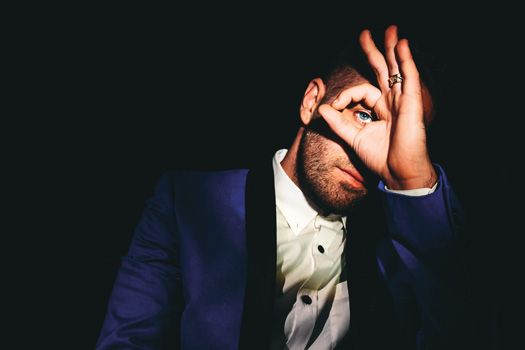
Another example of using video light for stills, this time a GL-1 Hotlight for a reception portrait of musician Davey Detail, at his wedding to actress and director Rose McGowan. Photo © Callaway Gable
Stitched Together Composite
SHOOTING PLAN
• Create five images in which each table was lit separately
• Expose with lowest ISO possible and mid-range aperture
POST-PRODUCTION PLAN
• Composite the five photos together
• Remove distractions
• Enhance the sky
• Turn the grass green
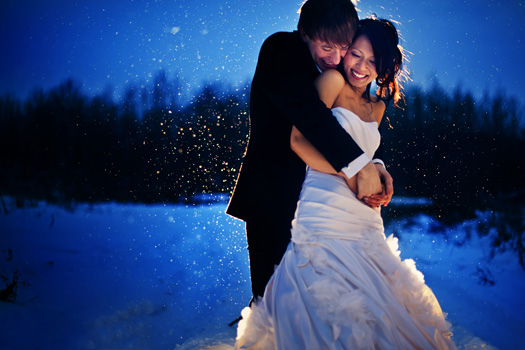
Photo © DQ Studios
4. FLASHAHOLIC CONFESSIONS—Dave and Quin Cheung
Dave and Quin Cheung of DQ Studios call themselves “Flashaholics” whose particular specialty is “guerilla lighting”— or as Dave explains it, “working quickly with minimal gear in any scenario—whether indoor or outdoor—with lights to create magic.” That means traveling with their lighting gear around the world (half of their shoots are international), so they can access it immediately upon landing.
This two-light shoot was no exception. A New Year’s Day wedding near the Cheungs’ home base in Calgary, Alberta, the couple and wedding party showed super-human strength in -13 degrees Fahrenheit on a farmland close to their venue.
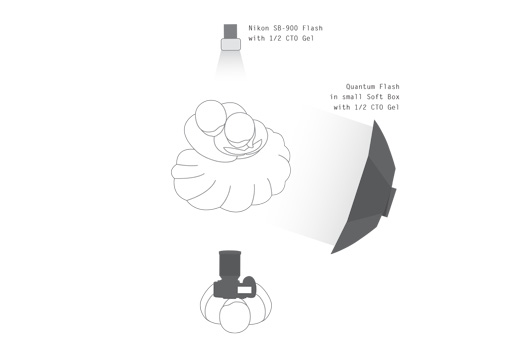
First, Dave set a strobe behind the bride, just below shoulder level and aimed toward the couple. Added warming gel made the sky bluer. Quin took her place behind the camera while Dave held a low-powered light with a 19-inch softbox (which goes with the team everywhere) just out of frame from the top right to get warmth on the couple’s skin. “We love that softbox because instead of using bare flashes that produce hard light, shadows fall really beautifully on subjects’ faces,” Quin says.
The Cheungs say the cool part about the image was the fine, unexpected snowflakes that showed up in the frame: “The snow was almost undetectable in person,” Dave says, “but because the light was flashing from behind, it lit up the snow.” Adds Quin: “We love when the light creates images that you can’t necessarily see.”
LOCATION: Farmland near venue in Alberta, Canada CAMERA: Nikon D700 LENS: 50mm EXPOSURE: f/1.4 at 1/250th of a second ISO: 100

Another on-location flash set-up, in which DQ Studios warmed their flash with a gel. Photo © DQ Studios
On Location Flash Tips
Leave the Gel On. “We always keep a warming gel on our flashes, even indoors,” Dave says. “It balances nicely against tungsten light for that warm glow and reduces post processing time because skin-tones are already warm.”
Have Softbox, Will Travel. The Cheungs never leave home without a softbox; it allows them to shape light and soften shadows.
Light with Lithium. When using flash in cold weather (as Canadians, the Cheungs are all-to-familiar) use Lithium AA batteries, which are not as affected by cold and will last longer than other batteries.
Related Links
Nick Fancher: Lighting on the Fly
Illuminating Celebrity Personalities with Clever Lighting
On the Ball: How to Set Up and Light Impactful Sports Shots
Related Articles
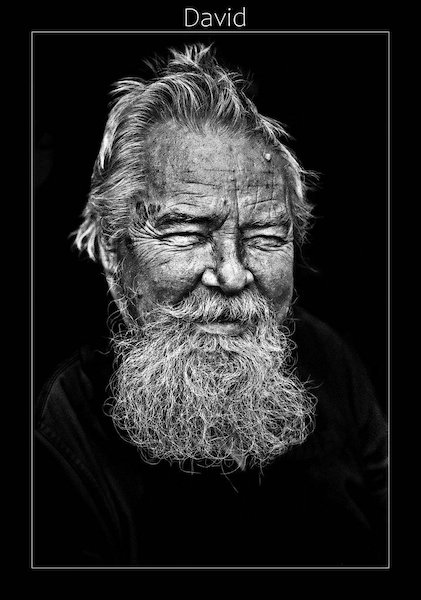
Capturing Humanity: Crombie McNeill’s Portraits of the Homeless
July 19, 2023
When Canadian photographer Crombie McNeill first started his career in photojournalism in the early 1960s, a peer suggested that he visit the Union Mission and take some portraits of the homeless people there in order to build his portfolio. Based in Ottawa, Canada, for the entirety of his career, McNeill entered the Union Mission skeptical that anyone would allow him...
More »

From the Rockies to Patagonia: Elopements that Go the Extra Mile
June 28, 2023
With the eye of an eagle, the endurance of a mountain goat, and the joy of a wildflower in the breeze, Chilean-born Andrea Enger was destined to become a photographer of adventure elopements. She has overcome her share of challenges as both a Latina woman and immigrant, pioneering into photography with her heart set on a life of creativity. Now...
More »
Robyn Lindemann Finds the Light in her Darkening World
February 27, 2023
Robyn Lindemann had to give up her wedding business after being diagnosed with retinitis pigmentosa. Now she's traveling the world before she goes blind.
More »
