OnOne Software Plug-in Suite 5
April 1, 2010
The Photoshop plug-ins from onOne Software have always been a mixed bag because of the range of photographers to whom they appeal. Genuine Fractals and Mask Pro have been around for years and are likely to be found on the hard drives of many professional commercial photographers and retouchers, who frequently need these programs to scale and compose images. Professional portrait, wedding, landscape and fine art photographers are a more likely market for PhotoTools, FocalPoint and PhotoFrame—the photo effects plug-ins from onOne. And the tools in PhotoTune are more likely to appeal to advanced amateurs or professional photographers looking to quickly color-correct an image without dealing with Photoshop’s Curves.
Plug-in Suite 5 from onOne Software collects the latest versions of these programs into one cost-saving package. And these days, with many professional photographers taking on whatever work they can to survive, it makes sense to have all of these tools available. New versions of PhotoTune (v3), PhotoTools Pro (v2.5), FocalPoint (v2) and PhotoFrame Pro (v4.5) are included in Plug-in Suite 5 (PS5), along with the current versions of Genuine Fractals (v6) and Mask Pro (v4.1).
If you own any of these plug-ins, you know that it is possible to access them in two ways: from Photoshop’s File > Automate menu or from the onOne drop-down menu in Photoshop’s menu bar. PS5 adds another option, a menu Palette. You access this from Photoshop’s Window > Extensions menu by clicking on “onOne.” Doing so opens a floating onOne Palette that you can dock with your other palettes if you don’t want it floating. By saving your workspace, you can have it permanently available whenever you choose.
Initially, I thought the onOne Palette was really cool. If I were working on multiple monitors with lots of screen space available I would have left it visible. But eventually, to save screen space, I went back to calling the plug-ins from the menu bar as I am used to doing. The menu bar drop-down menu and the new menu palette both include a listing of the presets for each plug-in. By selecting a preset, you automatically apply it without actually opening the plug-in. I found that this works best with plug-ins that I created, named and saved myself, but if you use one of the onOne presets often enough to remember its name and effect, it would also work well. A real time saver.
In fact, what I find most welcome in PS5 is the thought that onOne has given to making the Suite easy to use. From initially accessing the plug-ins, to the generally identical and attractive look to the interfaces, to the common tools, to saving out the effect in most cases as a separate layer in Photoshop, PS5 sets the standard for ease of use for a sophisticated Photoshop plug-in suite. Usability is further enhanced by the detailed HTML help in each plug-in and the easy access to tutorials and the onOne Exchange of onOne- and user-created presets. And there is an added bonus: If you own Lightroom or Aperture, all of the plug-ins except Mask Pro are also available from these programs.
Since Genuine Fractals and Mask Pro have not changed and have been reviewed here in the past, let’s look at the plug-ins that
have changed:
PhotoTune 3
PhotoTune is designed to be used early in your workflow to optimize dynamic range, color, skin tone and sharpness without having to learn to use the corresponding tools found in Photoshop. Having used the Photoshop and Lightroom tools for years, I didn’t find PhotoTune fitting into my workflow, particularly since the changes you make are applied directly to the image rather than to a new layer when PhotoTune sends you back to Photoshop. For photographers new to Photoshop or those looking to avoid Photoshop tools, PhotoTools does do an excellent job of optimizing images.
New to PhotoTune 3 are dynamic range enhancements that remap tones to look more “natural,” more like how the eye sees the original scene. I found this to be particularly visible with landscape photos.
PhotoTune 3 can operate in two modes, Wizard and Pro. The Wizard mode has modes for photos with people and those without. It walks you through the image optimization by presenting corrections to your image and letting you select if you like the correction or the previous version better. The Pro mode gives you tabs for Tone, Color, Skin Tone and Details adjustments, and sliders in each tab to adjust the image. Again you compare the new adjustments with the previous image until you like what you have done.
This is all very workable and the results are excellent, and if this is how you choose to work, you should love PhotoTune.
PhotoTools 2.5
PhotoTools includes hundreds of presets for enhancing images. You select an effect and add it to the “Stack” of effects. The Stack is like the Layers Palette in Photoshop. You can turn effects on and off and adjust their opacity. And you can stack up to 16 effects to create your own unique look, which you can save as a new preset. You can apply any preset automatically to a folder of images from Photoshop’s File > Automate > PhotoTools 2.5 menu.
There are a number of new features in this new version of PhotoTools. A MaskingBug, similar to the “bug” in PhotoTools make it relatively easy to place and blend multiple effects. Thanks to the MaskingBug it is possible to apply the new dynamic effects like vignettes, lighting and color grad filters. You can also brush effects on or off using the
masking brush.
Also new in v2.5 is a collection of environmental effects and one of vintage and grunge effects. The environmental effects include rain, snow, fog and rainbows. The vintage and grunge effects should be a sure hit with high school seniors. When you apply the stack, PhotoTools sends you back to Photoshop with the resulting image on a new layer.
There are useful presets for just about every photographic image, and onOne has made it easy to find the one for which you are looking. The only thing I wish is that I could see the effect on my image before I applied the effect to the stack. There is a thumbnail preview available with the effect applied to a generic image, but I found this to be not very helpful. I would have preferred the thumbnail to be the image on which I was working so I could have a better idea of the resultant effect.
PhotoFrame 4.5
If you are creating flush-mount albums or are scrapbooking, or just want to have fun with your images, the new PhotoFrame plug-in is for you. The Library contains 1540 items, and you can create and add your own to these. Along with a myriad of preset frames and framing effects there are backgrounds, texture overlays, backgrounds and adornments, including tape edges. There are also film edges, darkroom effects and even effects that simulate looking through the viewfinder of old cameras. As with PhotoTools, you can now apply any preset to a batch of images using Photoshop’s File > Automate command.
Again there are excellent search tools, extensive help and in PhotoFrame, built-in video tutorials to get you started. I found this extremely helpful since I don’t have the occasion to do this type of work in my commercial photography business.
There are many changes in PhotoFrame, not the least of which is an entirely redesigned interface. It now looks essentially the same as all of the other plug-ins. When PhotoFrame opens, the revised Library window shows you your working image within the library of frames, although you can choose to view just the frames themselves. You can zoom in and also rate frames so that you only see your favorites.
Many new frames are available and some of the old ones have been deleted. However, you can download the deleted old frames from the onOne Web site, giving you a total of about 4000 frames from which to choose.
Also new in v2.5 is the ability to resize, rotate and reposition the image layer, similar to using the Free Transform tool in Photoshop. This greatly aids your ability to create interesting page layouts within the plug-in.
All of the effects you perform on your image are saved in a Stack that you can save as a preset. When you are happy with the result, you Apply the Stack to your image and PhotoFrame sends you back to Photoshop with the effects added as a Group in the Layers menu.
Thanks to the built-in tutorial and the visually oriented interface, I was up to speed quickly with PhotoFrame. For me it was a fun new tool to play with; for portrait, wedding, seniors and event photographers it could become an essential one.
FocalPoint 2
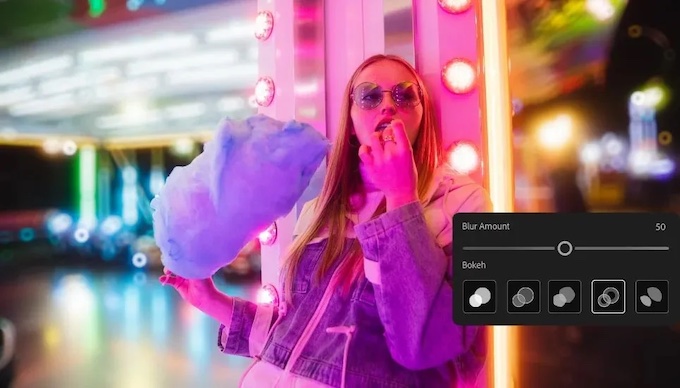
I’ve saved for last what, for me, is the best upgrade in PS5. FocalPoint 2 is a major overhaul of the previous versions. No longer are you limited to one FocusBug. In version 2 you can apply up to six to an image. Or you can turn the FocusBug “off” and blur the entire image or a selection you made in Photoshop. Or you can “paint” on blur with the new FocusBrush tool.
The blur itself is created using a new blur algorithm that produces results that look less like the Blur tool in Photoshop and more like a real lens blur. There are new presets for 14 Canon and 6 Nikon lens/aperture combinations, such as the 300mm f/2.8 lenses from both lines, with the choice of f/2.8 or f/5.6 blurs.
Other new features are also available. You can choose a shape for the lens aperture, from 3- to 11-sided. And there are tools to control the brightness and contrast of the blurred area. For images scanned from film, you can now add grain back into the blurred area to add a more realistic blur effect.
There are also 28 built-in presets with a variety of useful starting points, and the ability to adjust and save them as a custom preset. The plug-in provides a preview window with a generic image for presets so you don’t need to apply them to have an idea of their effect. Again, I would prefer the preview to be the actual image on which I am working.
I liked all these new controls and possibilities, but if you prefer, you can choose to go back to the version 1 toolset from within version 2 and still have the ability to use multiple FocusBugs. The very well designed vignette tool is available no matter which version you choose to work with, and you can set it to follow your blur, or
act independently.
FocalPoint 2 is a major upgrade and warrants the full number change. If you are now using version 1, you will surely want all of the new features in this upgrade, including its ability to be used as a SmartFilter in Photoshop CS3 and CS4.
If you are new to onOne plug-ins, the MSRP of Plug-in Suite 5 is $599. This is about the price of two to three of the individual plug-ins. The onOne Web site, www.ononesoftware.com, has upgrade pricing options for owners of individual plug-ins and owners of Plug-in Suite 4. You can also download a trial version of PS5 or any of the individual plug-ins. The site contains excellent video tutorials and helpful information. And while you are there, be sure to check out the free Lightroom plug-ins download.
Stan Sholik is a commercial/advertising photographer in Santa Ana, CA, specializing in still life and macro photography. His latest book, Professional Filter Techniques for Digital Photographers, covering both on-camera analog and post-production digital filters, is published by Amherst Media.


