
Software
Hands-On With ON1 Photo RAW 2017
April 5, 2017
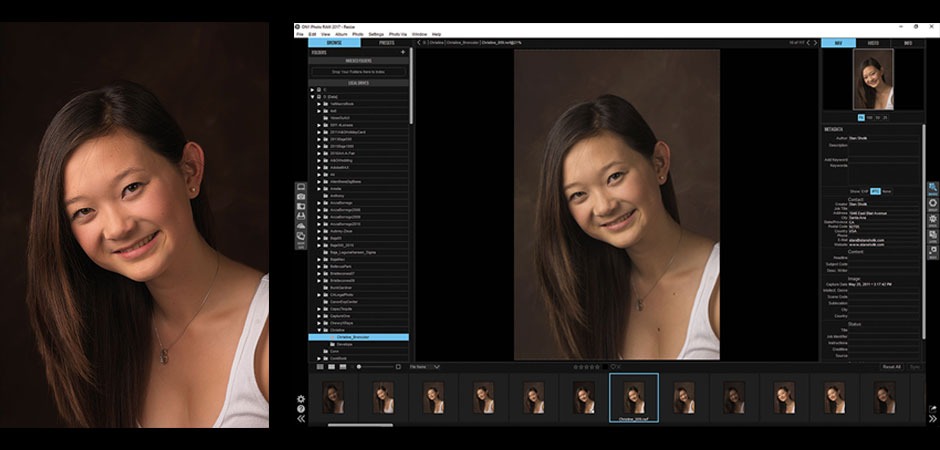
New in Photo RAW is the film strip view that is available in both the Browse and Develop modules.
There is so much new and noteworthy in ON1 Photo RAW 2017 that it should be considered as far more than just an upgrade to ON1 Photo 10, which it’s replacing. Available for both Mac and Windows computers, Photo RAW adds the basic functionality of Adobe Camera Raw to ON1 Photo 10, which already included much of the functionality of Adobe Photoshop, Lightroom and Bridge. There is only a single edition of Photo RAW, which includes the standalone as well as plug-ins for Photoshop CS6 or higher, Photoshop Elements 13 and 14, Photoshop Lightroom 5 or higher, and Apple Photos.
New users can purchase Photo RAW for $120, and Photo 10 users can upgrade for $100. A single activation allows installation on up to five computers. There is also an ON1 Membership Program available for $150 per year that includes free upgrades and other goodies. I used Photo RAW version 11.0.1 primarily as a standalone, but I tested the plug-in version through Lightroom and Photoshop.
What’s New
The biggest news in Photo RAW is its ability to non-destructively process RAW file formats, including portraits captured as RAW files and effects added from the Effects module. A complete list of cameras for which RAW file processing is available can be found on the ON1 website (on1.com)—users of medium-format digital backs should check the list carefully as only a few are compatible. You can save edits in the Photo RAW database or as sidecar files by choosing the appropriate option in Preferences.
Also significant is the addition of non-destructive local adjustments, made more powerful by the Perfect Brush masking brush. While the full tool kit of global adjustments is not available, exposure adjustments and more are available for local application.
Thanks to the addition of a film strip of images in the same folder displayed below the preview window, you can now copy and paste specific adjustments between images as well as sync all adjustments to multiple images. Plus, there are more ways to adjust effects, sync edits across computers or on a network and fast module switching.

User Friendliness
Being familiar with Photo 10, I had no problem migrating to Photo RAW. Other than Photo RAW’s new features and the renaming of Photo 10’s Enhance module to Photo RAW’s Develop module, the transition was seamless. New users will welcome the logical layout of the interface. Furthest to the left of each workspace is a tool palette, and next to the tools is a panel appropriate to the selected module. The center of the screen is dominated by a large preview image that you can quickly change to a view of the original. To the right of the preview is another panel appropriate to the module selected and at the far right are icons used to switch between modules. Along the bottom of the interface are intuitive icons for selecting different viewing options as well as icons appropriate to the module you are in. I rarely needed the menu bar at the top of the interface. Photoshop users will appreciate that the keyboard shortcuts are, for the most part, identical.
What We Liked
Photo RAW’s new functionality worked largely as expected. It is certainly capable of processing RAW files, and the ease of making local adjustments by masking with the Perfect Brush is very welcome when compared with the difficulties sometimes encountered making local adjustments in other software. The revised look to the interface makes it easy to navigate through Photo RAW, with all of the modules presenting themselves without major redraws of the screen. And the ability to copy and paste only certain adjustments is a nice feature, although Capture One does this far better.
What We Didn’t Like
While the new Develop module includes sliders for all essential adjustments, the range of adjustments is fairly limited. Noise reduction is particularly weak even though I like the option of applying it to shadows or mid-tones without applying the noise reduction to highlights. The Skin Retouching pane softened portraits more than I would have liked even when using its lowest setting. And when using the white balance eyedropper, I would have preferred to have a read of the color temperature value or at least see the slider move to a new position.
As for the speed increases in Photo RAW, I did find it faster than Photo 10, but switching between modules in Photo RAW was not as instantaneous as I expected. Adjustments sometimes needed to be rendered before switching, and the browser would occasionally introduce artifacts into my RAW files from older Nikons that are not there in Bridge. Unfortunately, these artifacts carried into the Develop module too.
As for the final exported TIFF output, I found it on par with Adobe Photoshop/Camera Raw and Lightroom, but still not at the level of Capture One, which remains my gold standard.
How It Compares
For photographers unwilling to accept the Adobe subscription model or the cost and learning curve of Capture One, ON1 Photo RAW 2017 represents an excellent option. This is especially true if your image processing involves the use of presets, which, while not new to Photo RAW, are available in abundance, along with the ability to create and save your own custom presets. There are functions that Photo RAW does not offer, but if those functions are not part of your workflow, you have a much cleaner interface to deal with. All in all, if you need an image-processing program for RAW, TIFF or JPEG captures, ON1 Photo RAW 2017 works quite nicely.
Stan Sholik is a photographer based in Santa Ana, CA, specializing in still-life and macro photography. His latest book, Shoot Macro, for Amherst Media is available now.
Related Articles:
Looking Sharp with Capture One Pro 10
ON1 Launches Next Gen Software [Tech Tuesday]
Related Articles

Adobe Max Roundup: Exciting New Features
October 19, 2023
Adobe Max, the company’s annual creativity conference, has just ended, leaving the latest innovations and features across Creative Cloud. You can revisit many of the keynotes and presentations on the Adobe site, but we’ve put together a quick overview of some of the most exciting photo and video news. Lightroom Most of the new features are available for all Lightroom...
More »

Nikkor Z Releases New Lenses & Tether Tools Updates Software
June 30, 2023
Nikon Z 70-180mm f/2.8 Good news for Nikon Z shooters! Nikon has added two new lenses to its Z-series line: the Nikkor Z 70-180mm f/2.8 and the Z 180-800mm f/5.6-6.3 VR. While the latter is best left to wildlife and sports photographers, we think that the Z 70-180mm f/2.8 model looks like a solid lightweight alternative to its more established...
More »
More Mobile Apps? Yes, Please.
May 31, 2023
Most of us have dozens and dozens of apps on our mobile devices. Some are opened every day; others may be specialized and used less frequently. Of course, there’s always a handful that lay dormant until we decide to clean up our screens. But, let’s face it, technology changes rapidly and as do our needs, so there’s always room for...
More »
