
Software Review: Alien Skin Exposure 7
February 20, 2015
It’s only been six months since the release of Exposure 6, but the folks at Alien Skin Software have already given us Exposure 7. With the level of new functionality in version 7 it would appear that it has been a busy six months indeed.
From its inception, Alien Skin’s Exposure has excelled in its ability to let photographers create and save a custom look for their images from its ever-expanding presets of black-and-white, color, cross-processing and Lo-Fi film emulations, as well as the ability to customize these presets with tonal adjustments, vignettes, texture overlays and control over film grain.
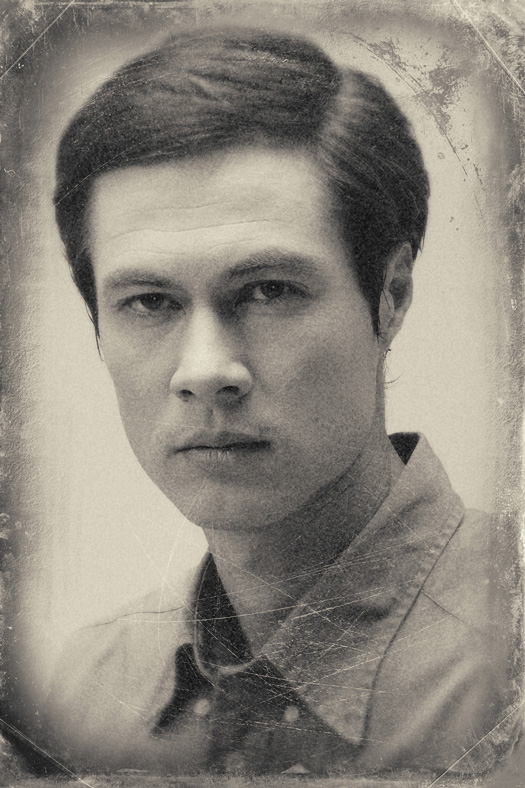
Daguerreotype (used in this portrait) is one of many historical film emulations found in the program, which also features the latest color film emulsions. Photos © Stan Sholik
WHAT’S NEW
Version 7 moves Exposure closer to becoming a complete image editor by adding non-destructive RAW file processing for the latest cameras along with file browsing and a crop and rotate panel to the standalone edition of Exposure. New film stocks, texture overlays and a bokeh tool are included in both the standalone version and the Photoshop and Lightroom plug-ins. If you prefer to use those Adobe products for file browsing and RAW file processing, be warned: while Exposure 7 performs non-destructive processing by storing adjustments in sidecar xmp files, it does not read xmp changes created in Adobe software, nor can Adobe software read the xmp file changes made by Exposure 7. It’s enough to make one cry, “Why can’t we all just get along?”
HANDS-ON TEST
I worked primarily with the standalone edition of version 7 to make the most of the new features. The interface of the standalone as well as the plug-in editions have the same attractive look and functionality that Alien Skin introduced in version 5. Sadly, you’re still not able to automatically close one tool panel when you open another to save mouse clicks on disclosure arrows or when dragging vertical edge sliders.
The new file browser panel is found in the left pane below the Presets panel in the standalone version. There is no need to import images into the program, and image thumbnails load very quickly. Version 6 marked a major speed increase in Exposure, and it carries over into all aspects of version 7.
RAW files as well as TIFFs and JPEGs are all visible in the browser. Since RAW support is new in version 7, the number of supported cameras is fairly limited at the moment, with an emphasis on newer models for both enthusiasts and professionals. A list of supported cameras is available on Alien Skin’s website. Support for older cameras is promised for the future.
MAKING CHANGES
Image adjustments are made using panels on the right side of the interface. The Basic panel, which is included in both the standalone and plug-in editions, provides all of the sliders needed to adjust image tonality for all file formats supported by Exposure. What’s missing is a histogram, or at the least some way to see if your adjustment is clipping the highlights or shadows of your image. The standalone version includes a rotate tool and crop options with common crop ratios as well as unconstrained crops. The other adjustment panels are unchanged, although new textures are included in the Overlays panel.
PROCESS & PRESETS
Workflow in Exposure 7 remains the same as in previous versions. It is essential to choose a preset once you have opened your image file. If you make adjustments and then choose a preset, the adjustments you made are replaced by the adjustments contained in the preset. There are 15 categories of color presets from which to choose, and 12 categories of black-and-white presets. Thumbnails in the presets panel show your image with the preset applied. Rolling your mouse over a thumbnail displays the preset effect on the main image in the workspace.
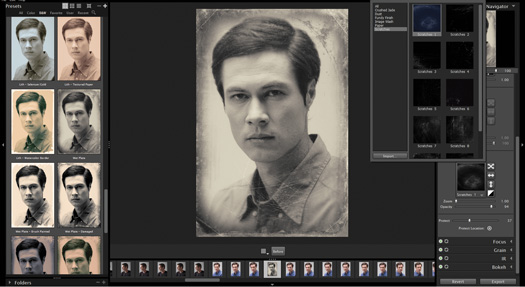
Presets are previewed on your selected image. Adjustments are made using panels on the right.
With a preset chosen, you are ready to move on to the adjustments. In the standalone, the available adjustments are Basic, Crop and Rotate, Color, Tone Curve, Vignette, Overlays, Focus, Grain, IR and Bokeh. Sliders in each adjustment give you a wide range of possibilities.
Once you are satisfied with the look, you can save the result as a user preset, which then appears in the left Presets panel in the Users tab. You can also export the resulting image. If you export an adjusted RAW file using the Original file type option, the original file is saved nondestructively with the adjustments and a copy of the unadjusted file is saved as a TIFF—not what I would have expected. However, if you export the adjusted RAW file as a TIFF or JPEG, the result is just what you would expect—the RAW file is saved with the adjustments, and a new, flattened file with the adjustments applied is saved as a TIFF or JPEG. As of yet, there is no ability to print the adjusted image, so another image program, along with the standalone version of Exposure 7, is still needed for that function.
GREAT LEAPS
With its newly incorporated ability to nondestructively process RAW files, and browse image folders, along with its ever-growing library of film emulation presets and adjustments, the standalone version of Exposure 7 has taken a great leap forward to becoming a complete image editor. As a plug-in, the range of effects in Exposure 7 are unsurpassed for the price. Whether you use it as a standalone program or a plug-in, Exposure 7 allows you to express your individual style and vision.
Alien Skin Exposure 7 is available for $149 for new users. Owners of any version of Exposure may upgrade for $69 and Exposure 6 users can upgrade for free. Check out the company’s special splash page for Rangefinder readers.
Related Links
Software Roundup: 4 Programs that Simulate the Look of Film
Taking Stock of Your Editing Toolbox
The (Surprisingly Doable) Workflow of a Film Shooter
Related Articles

Adobe Max Roundup: Exciting New Features
October 19, 2023
Adobe Max, the company’s annual creativity conference, has just ended, leaving the latest innovations and features across Creative Cloud. You can revisit many of the keynotes and presentations on the Adobe site, but we’ve put together a quick overview of some of the most exciting photo and video news. Lightroom Most of the new features are available for all Lightroom...
More »

Nikkor Z Releases New Lenses & Tether Tools Updates Software
June 30, 2023
Nikon Z 70-180mm f/2.8 Good news for Nikon Z shooters! Nikon has added two new lenses to its Z-series line: the Nikkor Z 70-180mm f/2.8 and the Z 180-800mm f/5.6-6.3 VR. While the latter is best left to wildlife and sports photographers, we think that the Z 70-180mm f/2.8 model looks like a solid lightweight alternative to its more established...
More »
More Mobile Apps? Yes, Please.
May 31, 2023
Most of us have dozens and dozens of apps on our mobile devices. Some are opened every day; others may be specialized and used less frequently. Of course, there’s always a handful that lay dormant until we decide to clean up our screens. But, let’s face it, technology changes rapidly and as do our needs, so there’s always room for...
More »
