
Beauty, Glamour + Fashion
Lindsay Adler’s Skin Retouching Theory and Take-Home Tips
May 24, 2018

The concept of retouching is not new when you think about how artists have historically approached portraits. Painters have been adjusting reality in their depictions of their subjects for centuries to de-emphasize features that were considered less desirable. Photographers have been practicing a similar approach. Like posing and lighting, retouching is another tool to help your subjects look their best and to help you achieve your vision.
There is no single right level of retouching—it all depends on your style and the purpose of the shoot. In any shoot, I must always consider the goal of that image, and I treat different types of shoots differently depending on that goal. Obviously, a high-end beauty campaign will get a different level and approach to retouching than an executive portrait session. But there are a couple of important things to keep in mind when approaching any kind of retouching.
First off, you shouldn’t see the retouch. If overly perfect skin is the first thing you notice, that will end up being a distraction for your image goals. For portraits, l remove blemishes and uneven skin, lighten wrinkles and bags under the eyes. I do my best to help subjects look their freshest. My aim is to capture the best version of the person on their best day. But I do not try to remove every smile line or unique feature. That is the key to making them still look natural.
For beauty retouching, I make sure the skin has a completely even complexion, smooth transitions and is free of imperfections. That being said, different beauty clients expect different levels of retouching. If the brand is trying to represent authentic and attainable skincare, perhaps more texture and believability to the skin is desired. If the brand is meant to be the pinnacle of perfect beauty, with a celebrity as the subject, a bit more unattainable perfection may be appropriate.
How do you decide if you’ve gone too far or not far enough? Give yourself time away from Photoshop and the image to look at it anew. I also think it’s best to get another pair of eyes on your photograph. Ask another photographer for his or her initial impressions: Is the retouch too prominent? Are any elements taking away from the beauty or impact of the subject?
Whether you outsource your retouching or correct every pixel yourself, it is still important to know what is possible, what your goal is, what has gone too far, and how you can add your own creative spin to the image in post.
As I started to build up a select group of trusted retouchers, I would often retouch one image from a batch to show them the type and level of retouching I was looking for. This way, they could use it as a guide to achieving my personal look on the rest of the images I provided.
I think of my retouchers as part of my creative team. Just like hair or makeup, I need an idea of what I’m looking for, but they help make the end results even better. As you grow your business, many of you may want to outsource basic skin retouching as a time-saving element, and that’s fine! But you’ll want to be sure you really understand retouching to give proper direction without over or under-doing it.

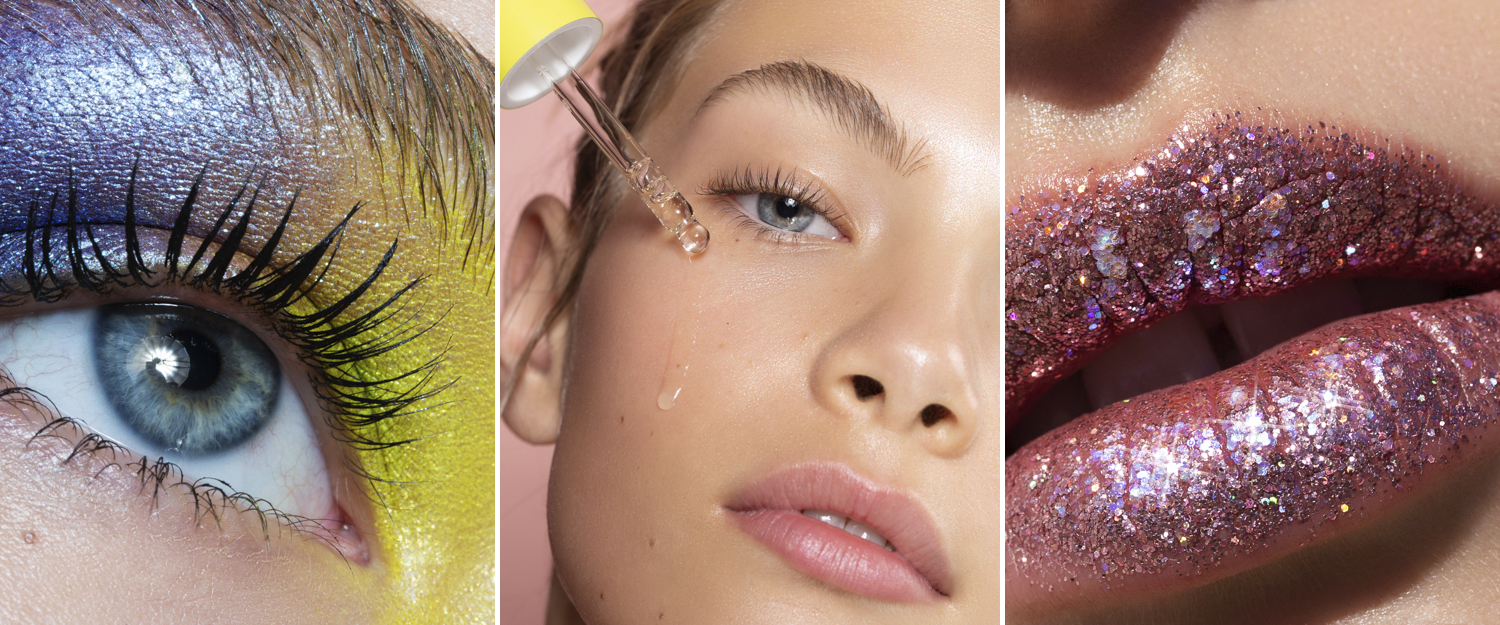
My subject for this beauty shoot had the most gorgeous skin to start off with. Many little adjustments add up to something with a lot more perfection and glow to the shot. Cleaning up small imperfections in the skin, filling in the eyebrows and giving the skin a yellower tone all made a drastic difference.
Tip: White balance and color correction using a X-Rite Passport Color Checker can help you get perfect, glowing skin tones in-camera.

Black-and-white toning is an art form in itself. From a single file, you can achieve drastically different moods and tonalities when converting from color. In this image, I aimed for a higher contrast conversion with specular highlights and lower key tones. I also heavily contoured the image for more drama.
Tip: Toning in Camera Raw can be a powerful way to transform the image by adjusting exposure, clarity, highlights, blacks and more for completely different black-and-white interpretations of the same file.
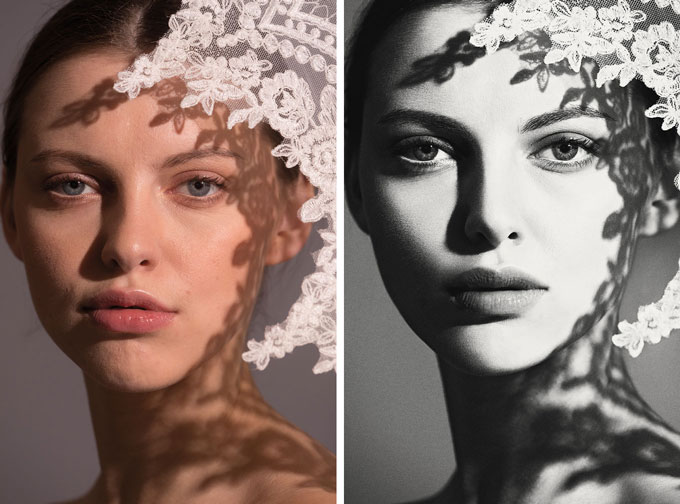
While typically you want to maintain skin detail in a photograph, sometimes having blown-out and pure white highlights helps you to achieve more of a vintage look, à la Richard Avedon beauty shots. To have that feel here, I went for high contrast, pure white skin and richer black. I also lightened the eyes and reshaped the lips.
Tip: Add grain to an image to introduce more texture and help “hide” the retouch on the skin.

Color grading is not color correction. Here, I purposefully used cooler tones to create the type of mood I wanted for the image. I had to make sure all of the skin had a similar tonality. The flag on the face that created the dark shadow was obscuring the skin, so the ear was mirrored and reconstructed to create symmetry to the shot.
Tip: The “Selective Color” adjustment layer allowed me to add more blue in the shadows for color grading. Although I shot in tungsten white balance to cool down the shot, I wanted even more of a desaturated and cool look.

This is an example of a heavy retouch on the skin. Since this was meant to be a surreal beauty retouch, I aimed for perfect skin to contrast the textures of the face mask. For me, it is nearly “too much,” but it seemed to emphasize the surreal perfection of the shot.
Tip: Localized burning and dodging allows you to even out skin tonalities for that perfectly perfect complexion.
Lindsay Adler is a fashion photographer whose latest book, The Photographer’s Guide to Posing: Techniques to Flatter Everyone, was published last year. She also posts videos on her education site, learnwithlindsay.com.
Related: How to Retouch Eyes in Photoshop
Exploring the Possibilities of Post-production with Compositions That Draw People In
Related Articles
Tips and Tricks for Photo Session Wardrobe Mastery
March 5, 2024
Let’s cover a few wardrobe tips and tricks to master your wardrobe for photo sessions! These simple guidelines will help you nail the look of your wardrobe. In short, we will discuss (in no particular order) bits and bobs, wallets, watches and spectacles. 1. Watch H-to-T What is H-to-T? It stands for Head to Toe. Feet, bottoms, kneecaps (and certainly fingernails) have...
More »
Photo Tips for Posing Men: The Only Time Manspreading is Okay
December 28, 2019
Posing can sometimes mean making subjects looks slimmer, but for men, you want them to dominate the frame. Here are some posing pointers.
More »
Changing Careers: From Scientist to Beauty Photographer
November 22, 2019
Did you ever notice Angela Marklew's bio says she used to test explosives for the Canadian government? We asked her to share her intriguing backstory.
More »
