
Tips + Techniques
Tips & Tricks from Roberto Valenzuela on Controlling Light in Any Scenario
March 31, 2017
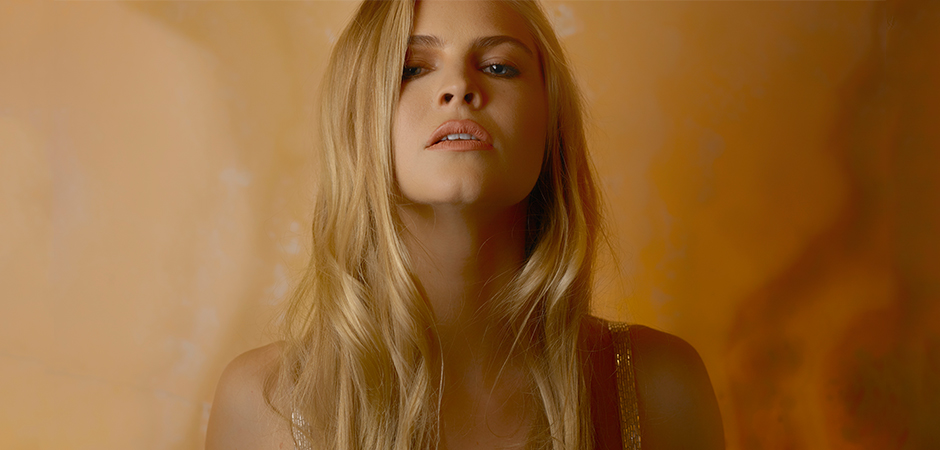
“Edgy and flattering” was Valenzuela’s vision for this portrait, and the model’s full lips were the feature that told the story. Neither available light nor a conventional beauty dish would have given him the result he was after. He positioned a strobe with a modifier camera left for the main source illumination and used a small reflector with a hard throw to brighten the shadow side of the girl’s mouth and create this provocative result.
Lighting is one of the most crucial aspects of wedding photography to master, but it can also be one of the most difficult and daunting concepts. In ShootDotEdit’s “Lighting Guide for Wedding Photographers,” I share key elements needed to successfully shoot in any scenario. These are elements that will help you identify the light and manipulate it to create the images you desire. (Access the entire guide here: bit.ly/2jhmmvc.)
1. Source and Direction of Light
When you go outside, first look to see where the sun is in the sky and where the shadows are being cast. Determine the root of the source versus the main light source. This determines the type of light you will work with and what color it will reflect from the surrounding object.
2. Flat Surfaces
In your location, look for flat surfaces, such as a wall or trimmed shrubbery. These surfaces can act as reflectors in your image and help produce ideal light. Notice whether you are working with surfaces that are light-colored, or ones that are dark and will alter the look of your images.
3. Shadows on the Ground and Walls
After you look for flat surfaces, locate the shadow line on the ground or surrounding walls. Check to see if the shadows are dark with harsh edges, or if they are light with soft edges. This helps you easily position your subject so the light is flattering for them.
4. Circumstantial Light Modifiers
Before you set up the shot, break down circumstantial light modifiers. Find out what the texture, color, shape, material and size is for objects in your location. These are crucial details to know, especially because these elements can make a significant effect on the light for your photos.
5. Backgrounds
As you position your subject, look at the background to see if it complements the photo. When faced with a distracting background, move your subject to a location that still has the best lighting but will not cause any issues.
6. Ground Characteristics
With less distractions in the background, focus on the color, material and texture of the ground. If your subject is in a position where the light that bounces from the ground is unflattering, you can easily move them to a location where the ground is a more flattering color or texture.
7. Pockets of Clean Light
Depending on where you shoot, the shadows you identify may be scattered on the ground or surrounding walls. Look to see if you can find any pockets of clean light. To create interest for the image and highlight your subject, use the shadow shapes to frame the shot.
8. Open Structures Outdoors
In the location where you shoot, look to see if there is a ceiling that casts open shade. This can help you when the light changes directions from a vertical path to a horizontal path, which affects the position where you place your subject.
9. Intensity of Light Differences
There are plenty of times when the light you work with is too harsh. Find a location where the intensity of light can create separation between the background and subject. This helps draw the eye to the subject and eliminate any distractions in the photo.
10. Reference Point of Light
The final element to look for is the reference point of light. Decide whether the light on your subject complements or contradicts the reference point. This can be done by finding the reference point from which you based your subject’s lighting.
Roberto Valenzuela is a photographer and WPPI educator who has a talent for identifying areas where photographers regularly hit roadblocks, and then developing clear and concise systems—including his three-book series, Picture Perfect Practice, Picture Perfect Posing and Picture Perfect Lighting from Rocky Nook—that allow photographers to break through those barriers.
To read this article in the digital edition, click here.
CreativeLive Video Tutorial: Picture Perfect Lighting, Taught by Roberto Valenzuela
Related Articles

Fine Art School Portraits: Get Started Today!
April 18, 2024
In my fourteen years of growing my custom portraiture business, one venture stands out as exceptionally beneficial: the launch of my Fine Art School Portrait service. Providing Fine Art School Portraits for select Seattle area schools not only brings in significant profits, but it also keeps my portrait bookings steady and eliminates slow seasons. Having photographed thousands of children ranging...
More »

In One’s Own Skin: Beautifully Real Self Portraits
April 17, 2024
I’ve long felt disenchanted with the contrived. I suppose that’s why I took a bit of time away from self portraits. It’s more challenging to capture something natural, authentic, and less curated when first you have to set up your camera, establish your camera settings, and get into place. Recognizing that self portraits have always been the catalyst for evolution...
More »

Master Natural Light Photography with Nikki Closser
April 11, 2024
When you master natural light, you can create amazing images in virtually any lighting scenario Mother Nature sends your way. In her portrait photography career of ten plus years, Nikki Closser has found that using the natural light of the sun is the easiest and most efficient way to create warm and authentic portraits, and she shoots 90% of her...
More »
