In case you haven’t heard,
Rangefinder has been running a series of Facebook giveaway promotions over the past few months (and yes, they’re still going on! Check out our
Facebook page to see the latest prize). For one promotion in particular, we teamed up with publishers Rocky Nook for a special
photo book giveaway, and we were thrilled with the response! So much so that we’re teaming up with them again to bring you a special excerpt from one of the giveaway books:
Food Photography: A Beginners Guide to Creating Appetizing Images, by
Corinna Gissemann.While the book is geared towards beginners, Gissemann’s step-by-step break down of photographing a meat-and-potatoes dish (excerpted here) is filled with tips and pointers that can teach even seasoned pros a thing or two.
The Shoot
 Left: The table is set up diagonally in front of the window with a diffuser behind the subject. Middle: The camera is positioned directly in front of the subject. Right: A reflector (with the water bottle taped to it) at front right softens the shadows.
I set up my table so that the light from the window hit the subject diagonally from behind, and I added a diffuser to prevent obvious shadows. I positioned the camera directly in front of the set. I placed a fill reflector to the right to prevent the right-hand side from looking too dark. Check out the water bottle taped to the reflector—this is a great way to keep a sheet of Styrofoam in place.
Left: My initial setup displayed obvious highlights. Right: I moved the plate to the other side of the table to combat the highlights. (Both images were taken with ISO 100, 1/6 second, f/8, 100mm).
To check my lighting, I used a plate with brown, green, and white dummies in place of the meat, vegetables, and potatoes. I shifted the camera to the left to combat the highlights on the edge of the plate. I then began to experiment with the positions of the other props, which included a wine glass and decanter in the background. Setting up glass objects in front of a white background can be quite tricky, so I poured some wine to help me get the positions right. Wine and juices don’t lose their fresh look as quickly as beer and shakes, so you can usually pour these at the start of a shoot.
Flatware is difficult to arrange effectively in closeups like this. In the first shot, it wasn’t conspicuous enough, and in the second it was too dominant. I shelved the flatware idea and started arranging the potatoes instead. Always start with potatoes or other firm vegetables that won’t collapse or lose their shape while you work. I then used a spoon to add the vegetables. Finally, I added the meat, placing it in the classic six o’clock position (check the position of the meat on the plate next time you eat out). I tried adding a third piece of meat, but this made the plate look too full. My test left behind some oil smears that I had to carefully remove using a Q-tip.
I began by arranging the potato wedges, followed by the vegetables (arranged with a spoon), and finally the meat. I used a Q-tip to remove some specks of oil from the edge of the plate.
I also rearranged the potatoes to give them more height and substance. To get the framing right, I moved the camera upward and slightly closer to the set, once again positioning the subject according to the lines produced by the rule of thirds. The meat ended up at the lower intersection of the imaginary lines. All this took time, so I had to brush some oil onto the meat to reinvigorate its moist look. Meat tends to dry out quickly, so you have to work fast to get this type of shot in the bag while every-thing still looks fresh.
Left: I raised the camera slightly and moved it closer to the subject, and positioned the meat at the intersection of the lines formed by the rule of thirds. I brushed oil onto the meat to keep it looking fresh.
I removed one of the broccoli florets to balance the composition, leaving just three on the plate. I also added some rosemary to the food and the background. I then repositioned the flatware—it had to fit in somewhere—and changed the aperture from f/8 to f/6.3 to increase the background blur effect. In the end, I opened it up one more stop to f/5.6, my favorite aperture. The sprig of rosemary in the background was too prominent, so I replaced it with just a couple of leaves. I still wasn’t happy with the effect, so I removed the rosemary altogether. Food photography often involves a lot of experimenting until a shot looks right. I also adjusted the position of the light-colored potato wedge so it wouldn’t draw attention away from the main subject.
Left: Moving the fill reflector forward lightened the meat and reduced the shadow effect. (ISO 100, 1/8 second, f/5.6, 100mm). Right: The final position for the flatware at the rear edge of the plate.
I shifted the fill reflector forward to soften the shadows at the front and lighten the meat. I moved the flatware to the rear edge of the plate to keep it in the frame but make it less obvious. As you can see, I left a couple of drops of oil on the plate to preserve the authentic look of the shot.
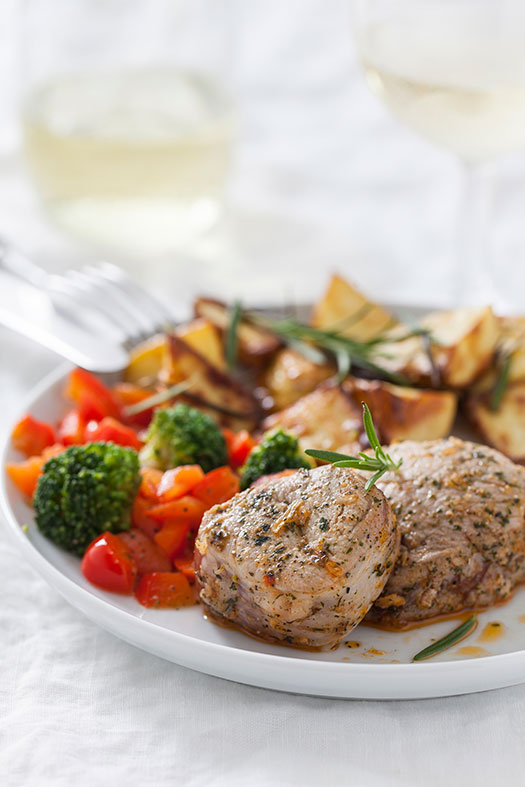
The Result:
Things to Think About
Problems and Solutions
• Main dishes are comprised of multiple elements and a plate can easily look too full. Try to look at your setup through the eyes of a guest at a restaurant—is it both visually attractive and appetizing?
• Sauces form a skin and quickly take on a matte look. Always make pouring your sauce the final step before you take a photo.
• Meat loses its moist look when cut, so you have to work quickly to keep your dish looking fresh.
• Vegetables also dry out quickly, so it pays to plan your shoot carefully and always keep some oil and a brush on hand to add moisture.
• Use dishes you have seen in restaurants as a guide when arranging the individual elements in a main dish. The star of the show usually faces the patron, although this is not a hard-and-fast rule. For example, meat also looks great served on a bed of mashed potatoes.
Styling Options
• Raw slate makes a classy alternative to regular plates.
• Use wooden serving boards instead of plates for rustic-style dishes.
• Try photographing your food in the pan used to cook it.
• Pots can also be used as part of a food photo composition.
• Rice-based dishes look great served in bowls instead of on plates.
Tips and Tricks
• Don’t fill the plate too much—smaller portions are more appetizing.
• Distribute vegetables and sides evenly on the plate.
• Always add the sauce last before you shoot.
• Arrange the firmer elements of your composition first, followed by the softer ones.
• Thicken sauces and position them carefully using a spoon. This gives you much more control over the way they look and flow.
• Use a piping bag to serve mashed potatoes and parsnips.
• Use a cup to form rice and arrange the other elements of the dish around the central rice dome.
• Whisk sauces to add froth before serving.
• Herbs, nuts, and edible flowers add variety to photos of main dishes.